Two walkthroughs in eight short chapters, with a screenshot for every step: a band from its first rider to its first festival, and the AV company running that festival’s stage. Both are the same festival day, seen from each side.
For bands: Your band’s first rider and first festival
You need nothing but a browser for chapter 1. From chapter 2 on you need the invite link from the festival’s AV company.
The AV company works in Crew at /crew/. The first time, it opens with a demo stage and a demo festival day you can change or replace. The top bar has the event, the four workspaces (Event, Stage, Shows, Show day), ↶ ↷ to undo and redo any change (Ctrl+Z, Ctrl+Shift+Z), the shortages warning, Projects and Print / PDF.
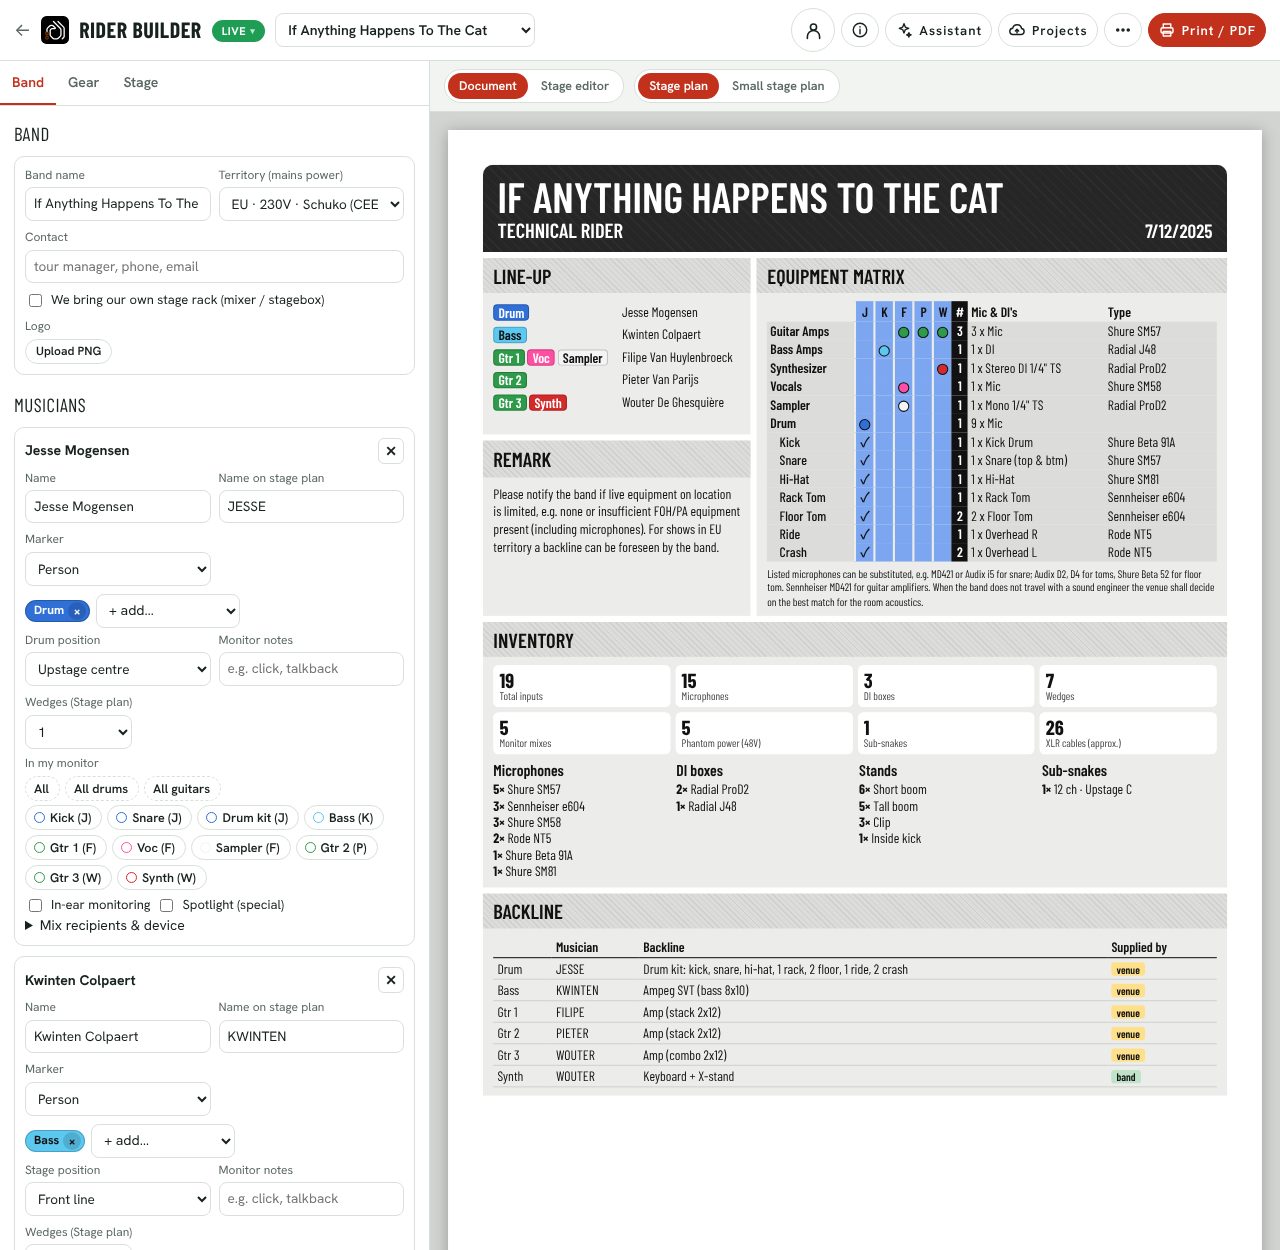
Open the Rider Builder at /rider/. On the Band tab, add each musician with + Add musician and pick what they play. The app fills in everything else: inputs, mics, DIs, amps, wedges, the stage plan, patch and power.
Pick an instrument to add it to that musician.
Where they stand: front line or back line beside the drums; a drummer upstage centre, right or left.
In my monitor: tap the band’s inputs, once for a bit, twice for lots (All or All guitars does a whole group). It fills in the monitor mixes and the monitor sends in the X32 scene.
In-ears, and a spotlight for whoever needs a special.
Everything is saved in this browser as you type. Fill in the band name, contact and date above the musicians.
1.2 Check the gear
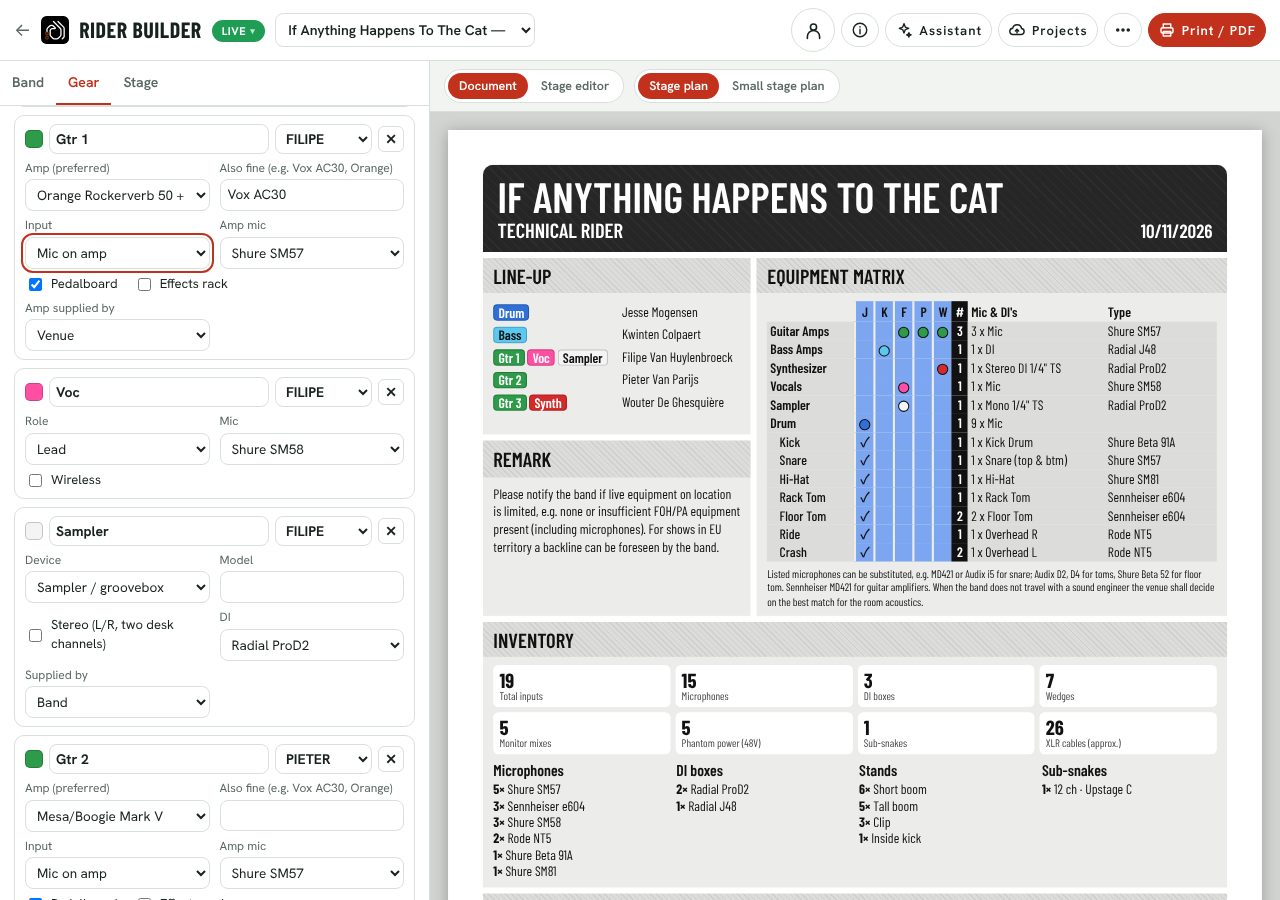
On the Gear tab every instrument has a card. It is short at first: what you bring and how it connects. For a guitar or bass, say which amp model you want and what else is fine: festivals match that against their backline. Tick More detail: models, mics & DIs to pick the amp drawing, mics and DIs too (the screenshot shows it ticked). Pedalboard and effects rack are side by side; the drum kit is listed kick first, crash last.
The amp you’d like, from the list (its drawing appears on the stage plan by itself), or Other to type it.
Alternatives you’re happy with. The more you list, the fewer surprises.
Mic, DI or both.
Do you bring the amp, or does the venue?
1.3 Set up the stage plan
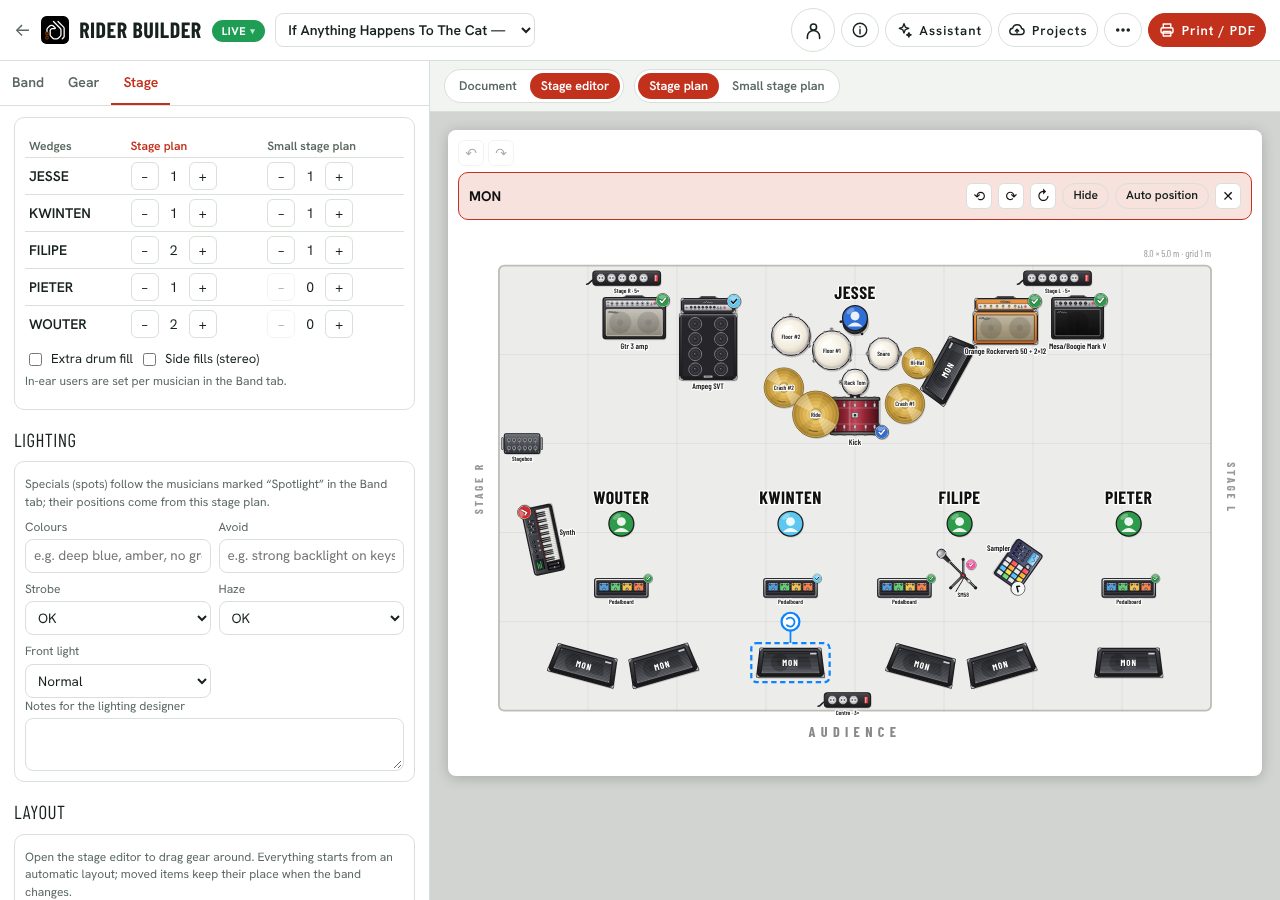
The Stage tab opens the stage editor. Set the wedges per musician and your lighting wishes, then drag anything that isn’t where you want it.
Wedges per musician.
Lighting: colours, what to avoid, strobe, haze, front light.
Click an item to rotate it, hide it, or send it back to its automatic place.
Drag to move (hold Shift for small steps). Wedges slide sideways only and never overlap.
The drawing is the audience’s view: its left side is stage right.
Made a mistake? ↶ / ↷ above the plan (Ctrl+Z, Ctrl+Shift+Z) undo and redo changes to the stage plan.
Playing small rooms too? Duplicate the stage plan (Stage tab → Duplicate) and give the copy fewer wedges or a smaller stage, or press + Small stage plan.
1.4 Print it, or save a PDF
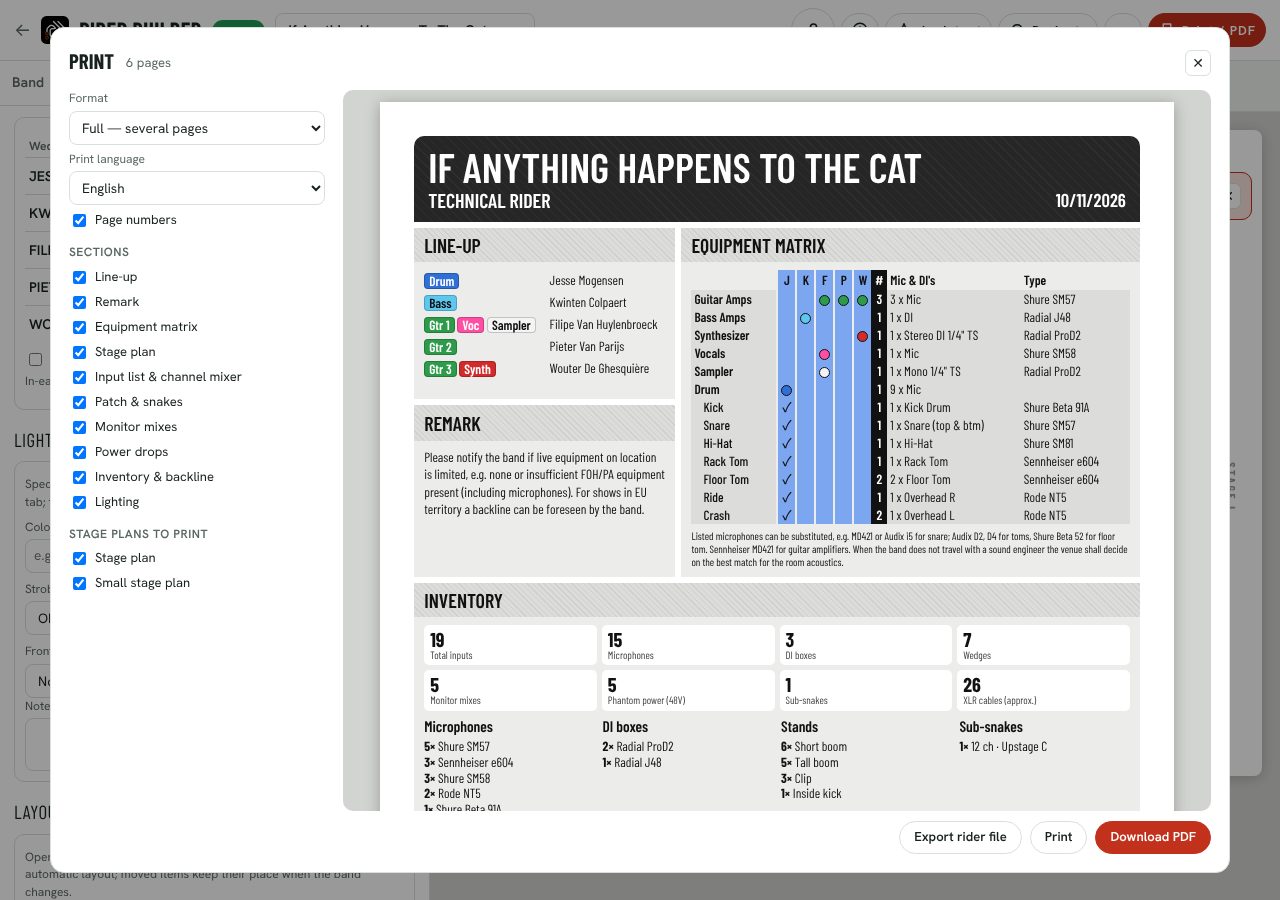
Press Print / PDF: the print window shows the settings next to the pages. Then Download PDF.
Condensed (one A4 per stage plan, fixed layout), full (several pages), or labels.
English, 中文, or both.
Sections and stage plans.
The pages as they will print.
Download PDF.
For bands · Chapter 2 of 8
Join the festival
Open the AV company’s invite link, sign in and take your slot.
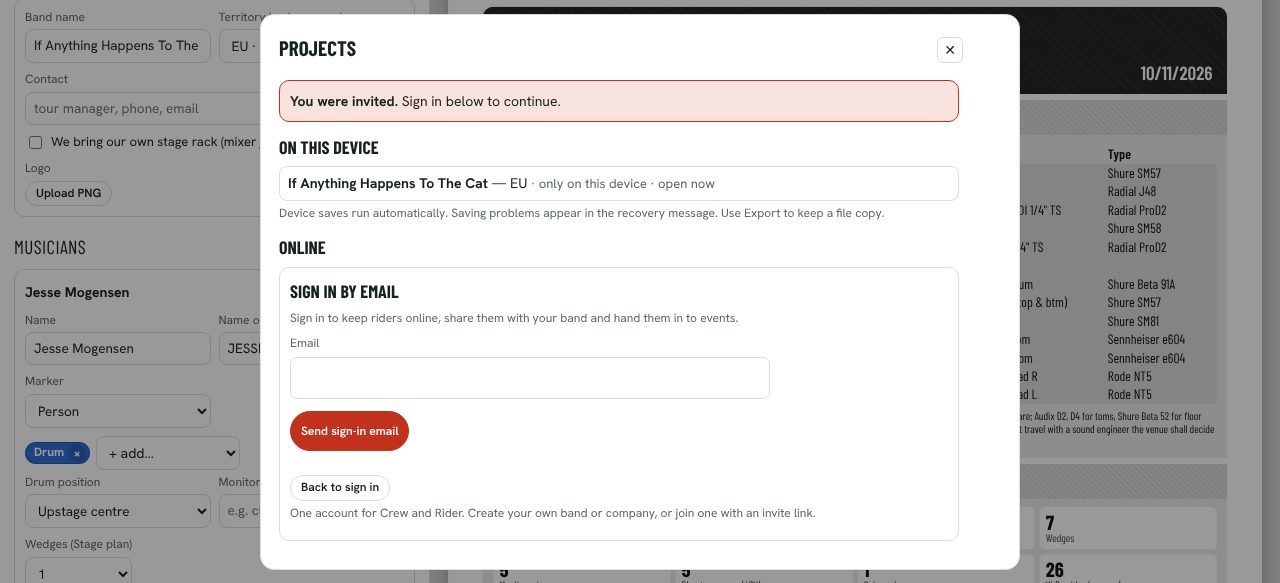
The festival’s AV company sends you a link for your slot (by email or chat). Open it: the Rider Builder opens with Projects and asks you to sign in. Type your email and press Send sign-in email.
You came in through an invite.
Your email address. Because you were invited, this creates your account.
Send the sign-in email.
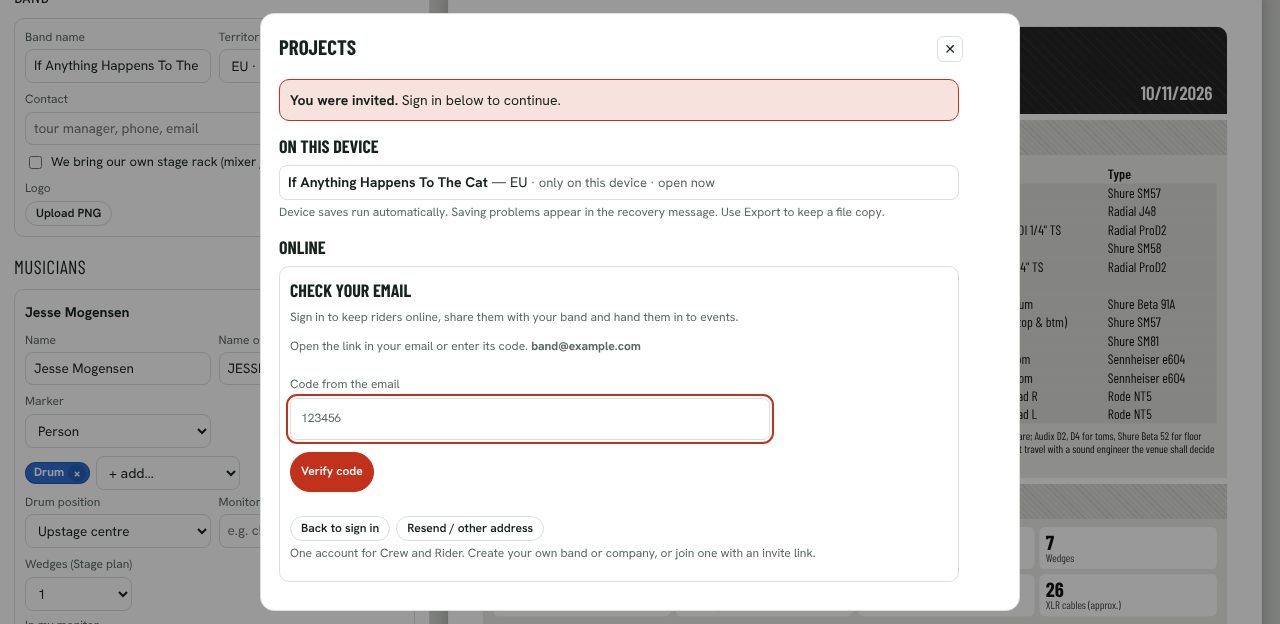
Click the link in the email, or type the code from it here.
Where the email went.
The code from the email, then Sign in.
Typo? Use another address.
2.2 Take your slot
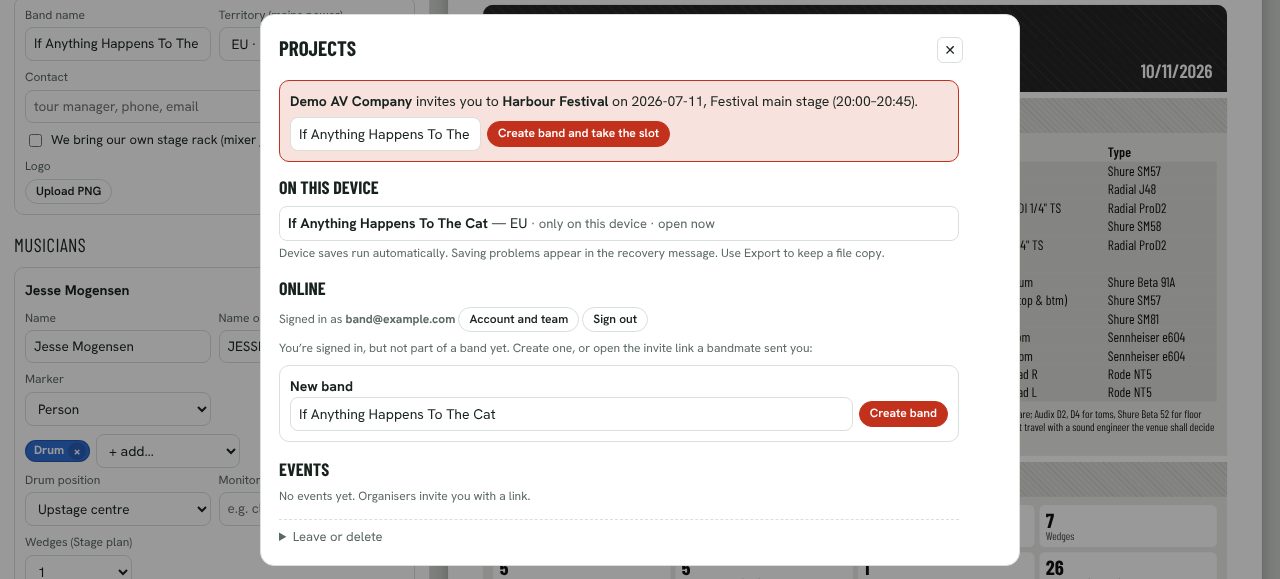
Once you’re signed in you see who invites you to what. Create your band on the platform; it takes the slot straight away.
The organiser, the event, the stage and your set time.
Your band’s name.
Create band and take the slot. (Already on the platform? Pick your band and press Take this slot.)
Who you are signed in as.
For bands · Chapter 3 of 8
Hand in your rider
Save the rider online so the whole band has it, then hand it in for the event.
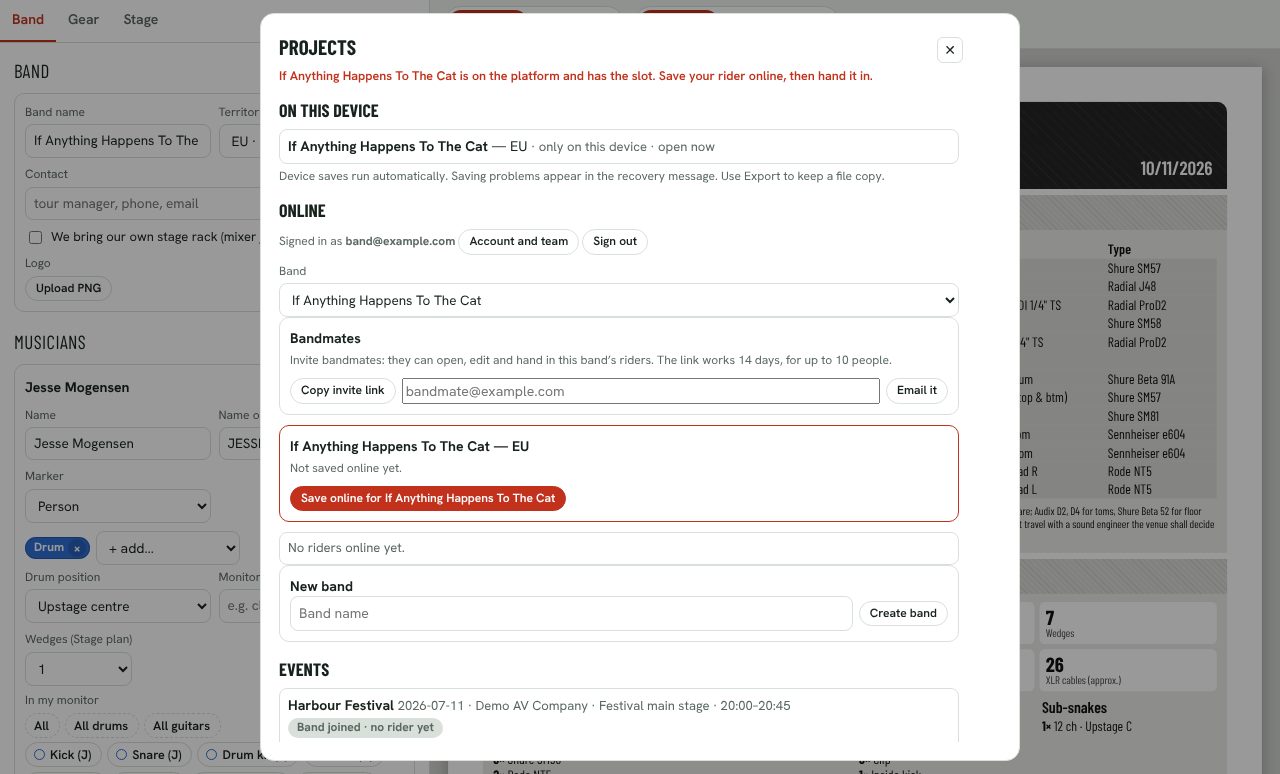
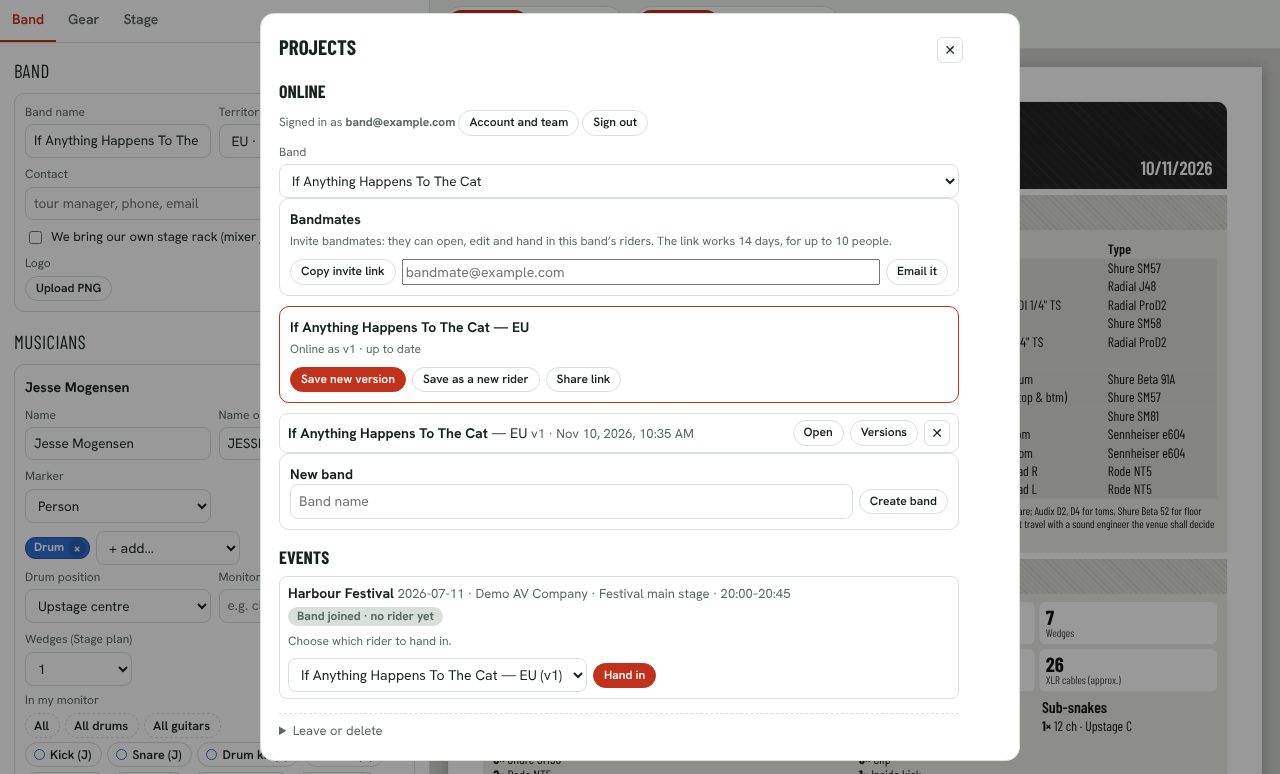
Still in Projects: save the rider that’s open as your band’s rider online. From now on everyone in the band can open it, and every version you save is kept.
Your band.
The rider that’s open on this device: not online yet.
Save online.
The event: you joined, but haven’t handed in a rider.
3.2 Hand it in
Under Events, choose the rider and press Hand in. Until the AV company freezes it, they always see your latest saved version.
Online as v1, up to date.
Where the slot stands.
Which rider to hand in.
Hand in. You can hand in another one instead until the freeze.
3.3 Share it with any company
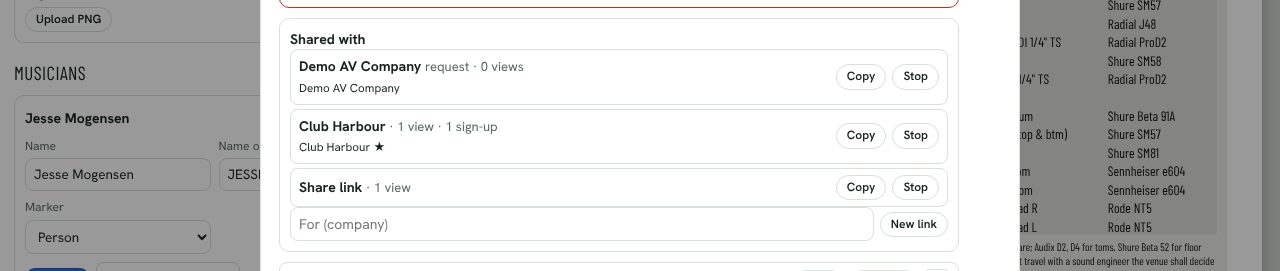
No invite? Send your rider anyway. In Projects, press Share link on the rider that’s online: the link is copied. The company opens your live rider in the browser without an account, can download a PDF, and always sees your latest saved version. Your printed pages now carry the link as a QR code.
Give each company its own link: type its name under Shared with and press New link. The list shows each link’s views, the companies that added it to their events and who signed up through it (★). Stop ends one link without touching the others.
Shared with: every link of this rider.
A link made by answering a company’s request.
The companies that added the link; ★ = signed up through it.
Copy or Stop each link on its own.
Name a company and press New link for its own link.
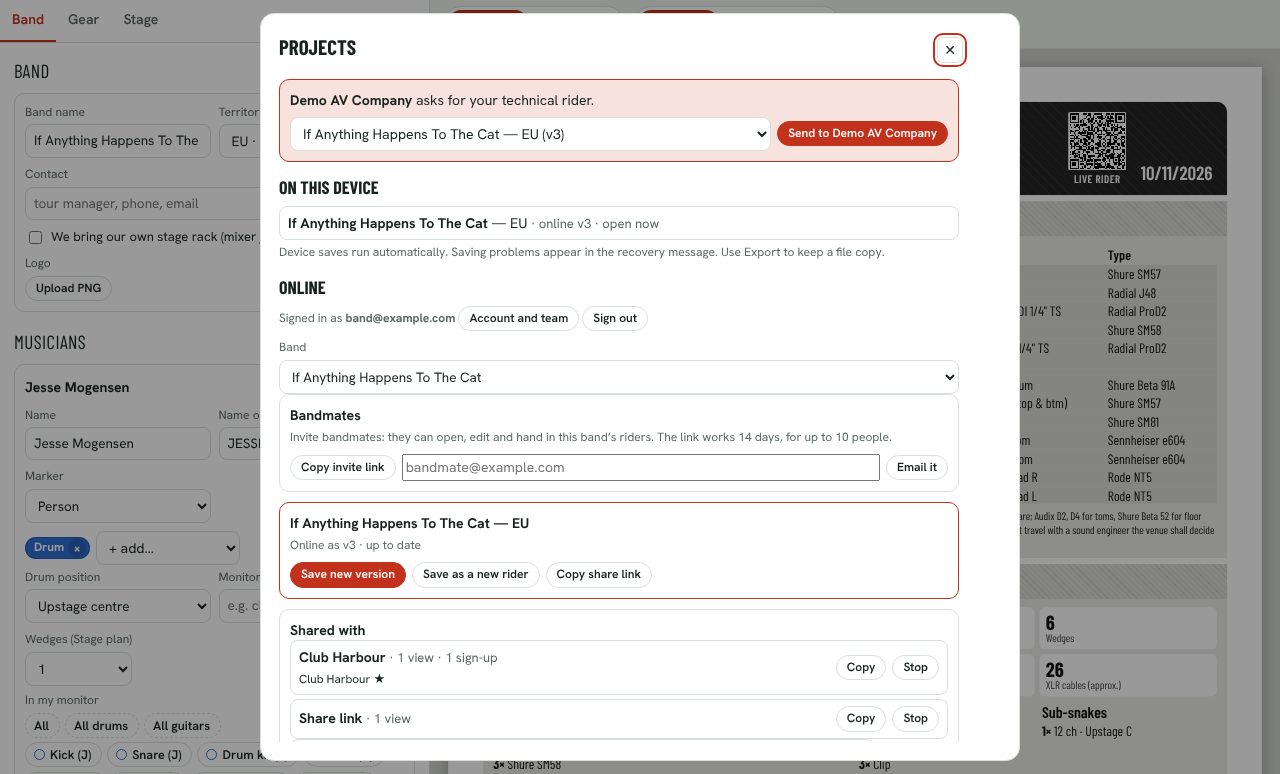
When a company sends you a request link, open it, sign in, pick the rider and press Send to …. No band on the platform yet? Create it from the same screen.
Who asks.
Which online rider to send.
Send.
For bands · Chapter 4 of 8
After the freeze
What happens once the AV company freezes your rider: changes, declined notes, stage changes and older versions.
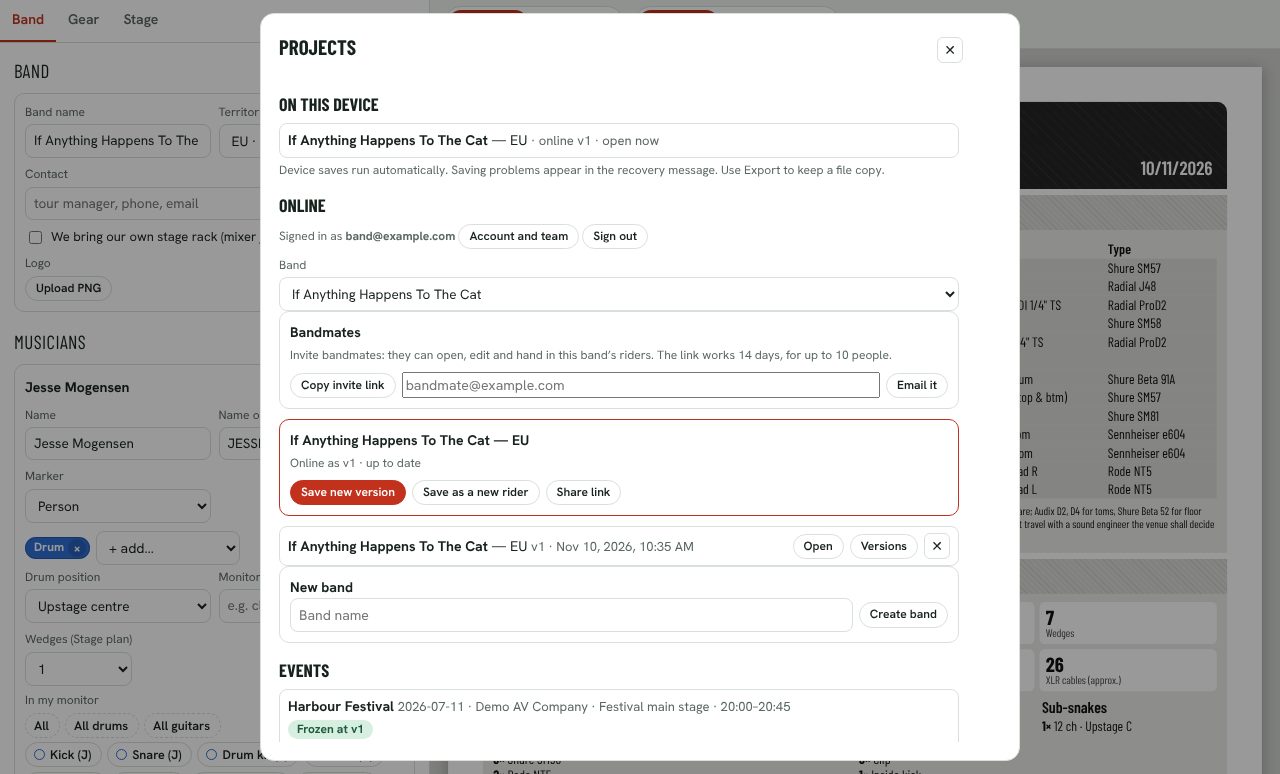
When the AV company is ready to build the stage, they freeze your rider. Projects shows it under the event.
Frozen at v1: they work with exactly that version.
You can still save changes: they see them and accept or decline.
Your rider online.
4.2 Save a change
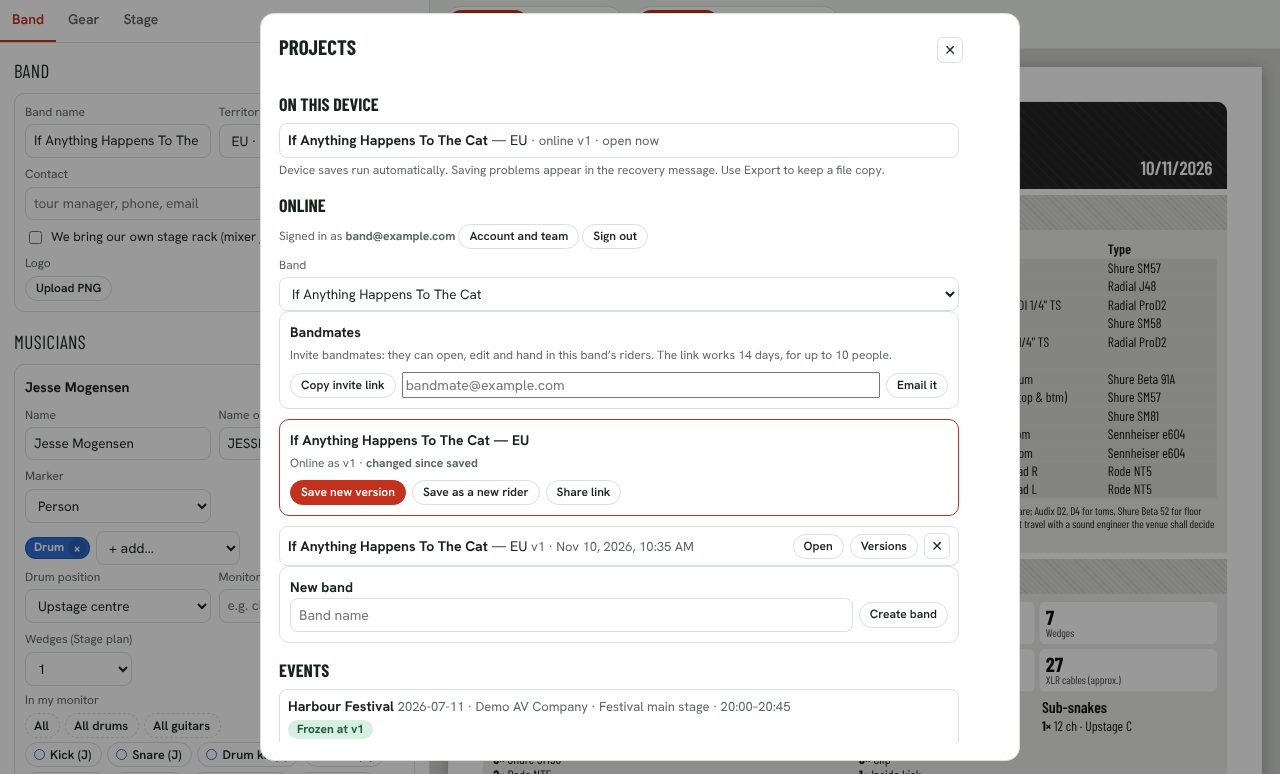
Two weeks later Wouter wants a second wedge and the sampler goes stereo. Change the rider as usual; Projects shows it has changed since it was saved. Press Save new version.
“Changed since saved”: the change is only on this device so far.
Save new version: the band and the AV company see it.
Or keep it apart as a separate rider (it won’t reach the event).
4.3 See it waiting, or declined
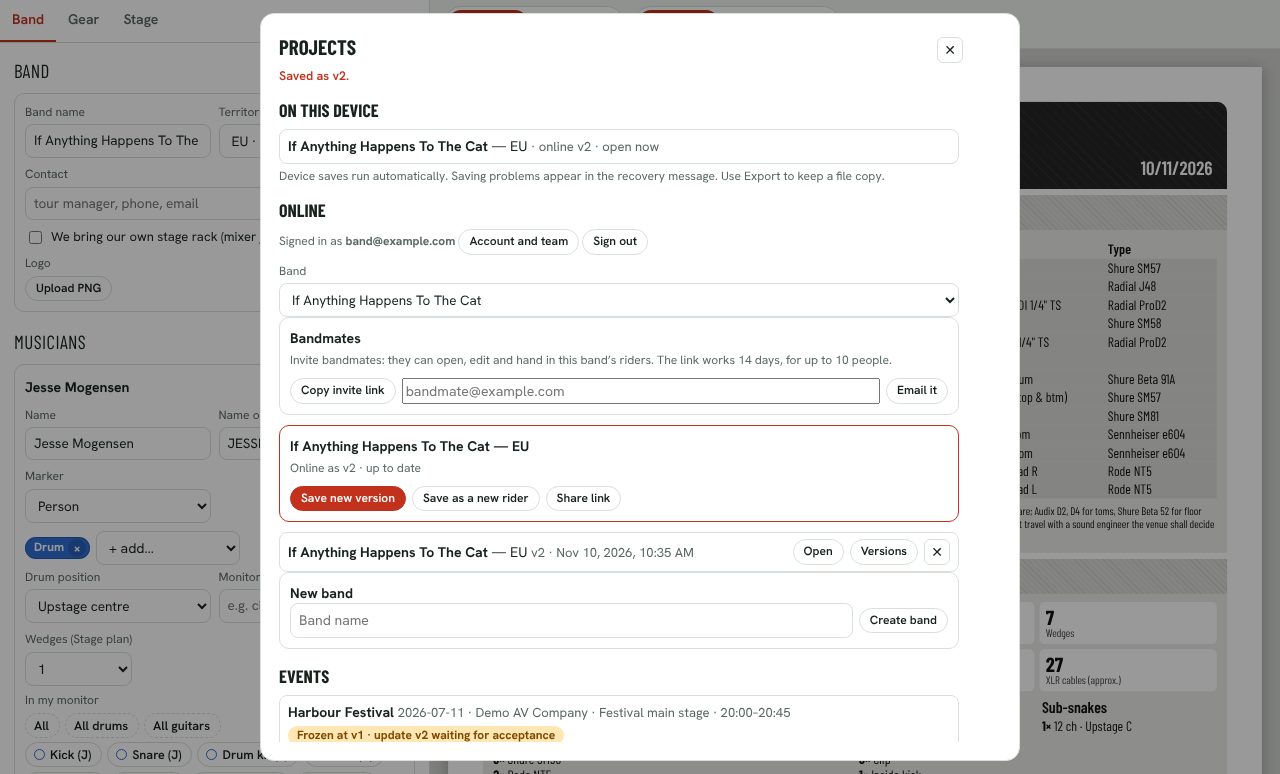
Because your rider is frozen, the new version waits for the AV company.
Saved as v2.
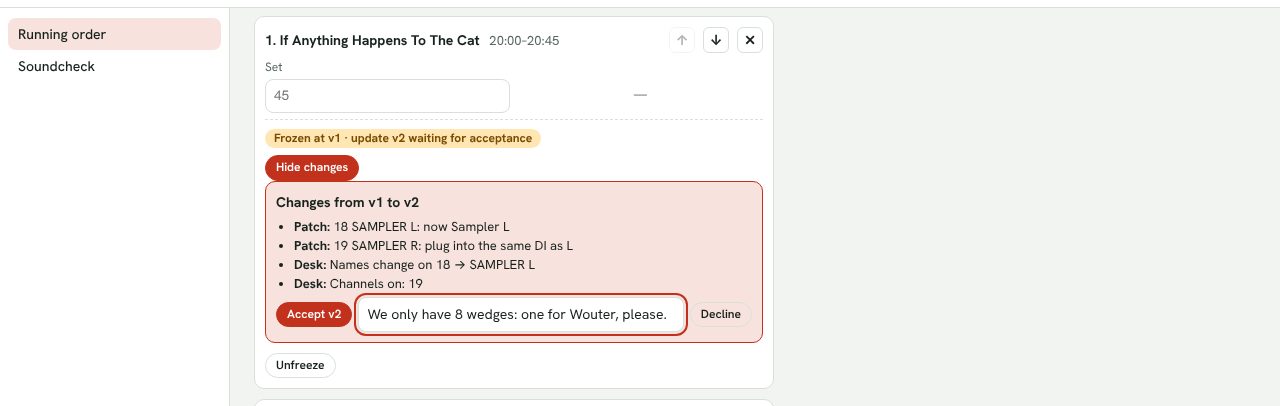
Frozen at v1, update v2 waiting for acceptance.
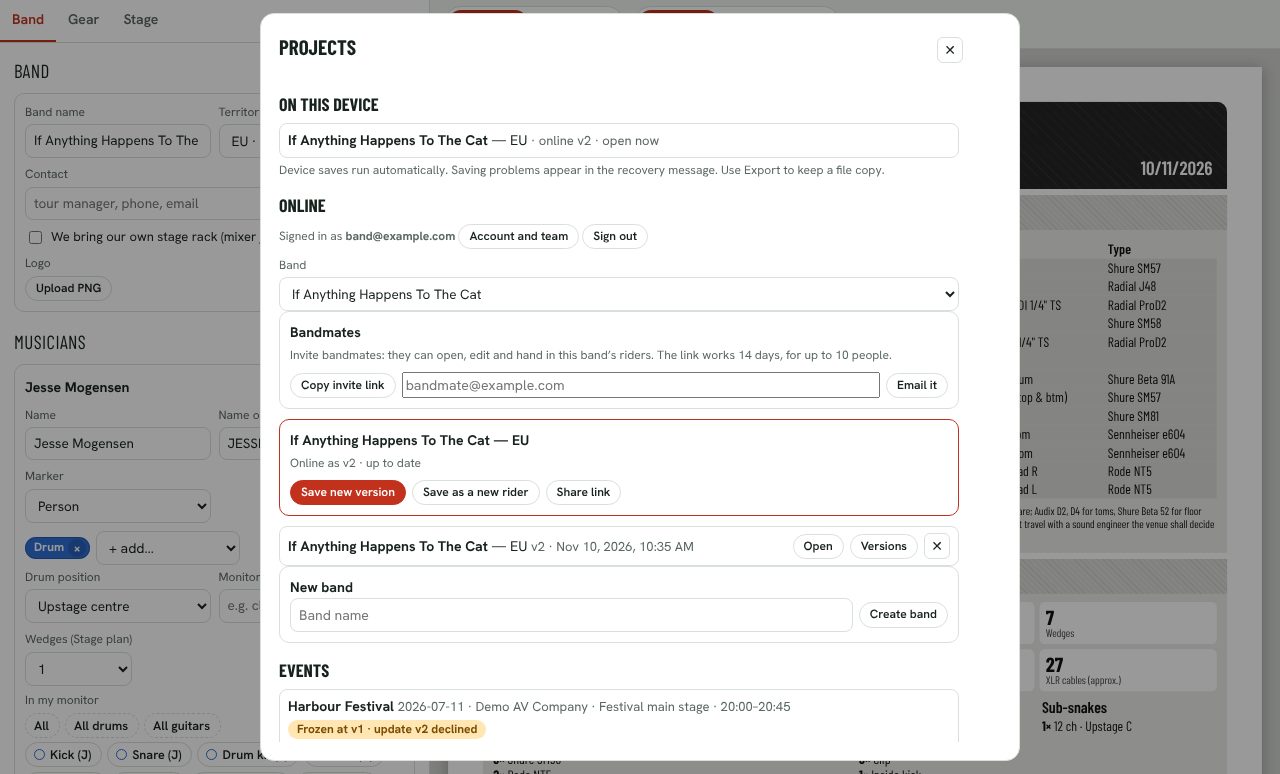
They accept it, or decline it with a note. A declined update stays declined until you save another version.
Update v2 declined: they keep working with v1.
Their note. Here: one wedge for Wouter, so the band saves v3 with one wedge and the stereo sampler, and the AV company accepts that.
4.4 Acknowledge a stage change
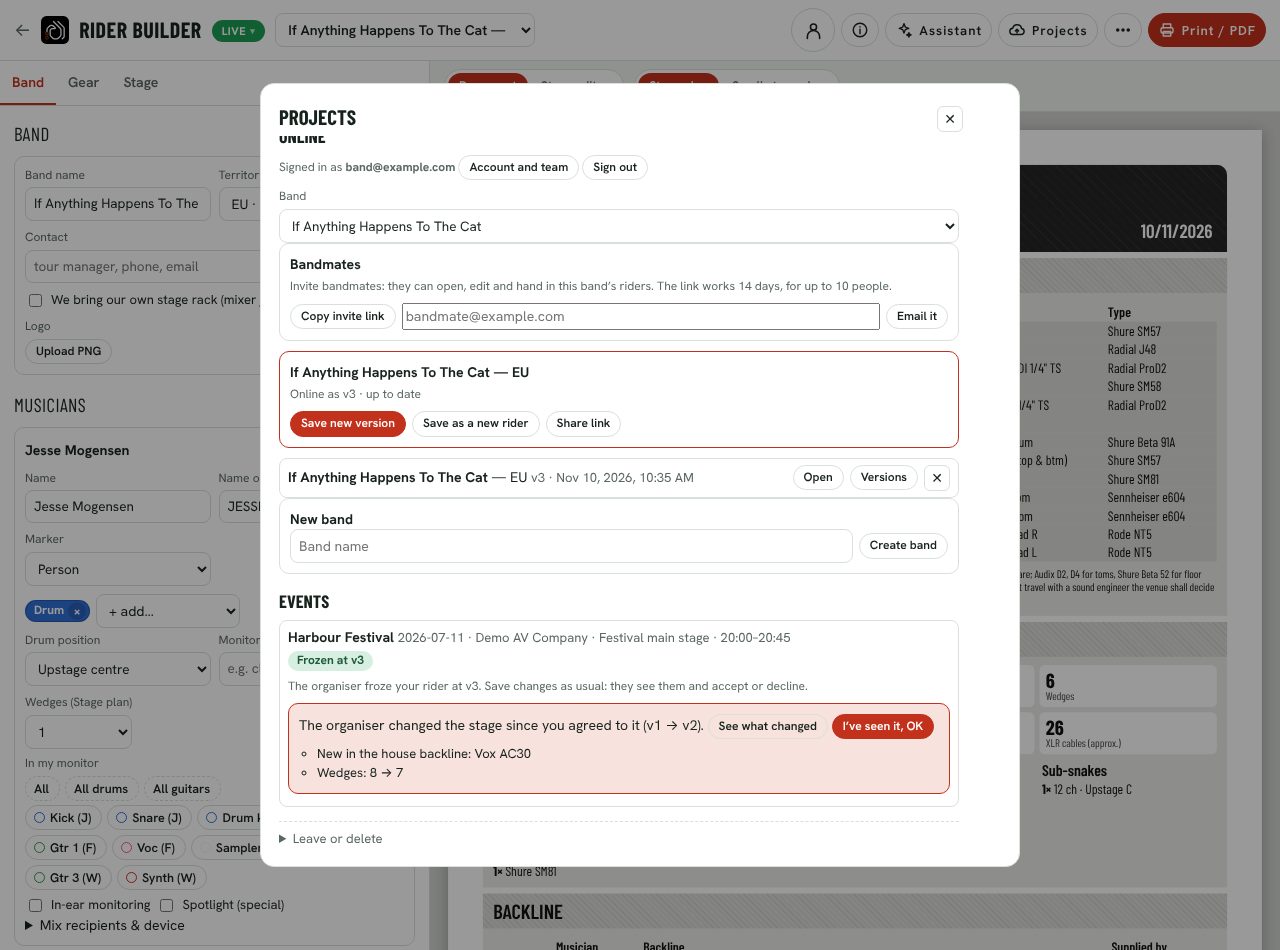
The AV company may change their stage after the freeze: another amp, one wedge less. You’re asked to look at it.
Your rider: frozen at v3.
See what changed: house lines, house mics, backline, wedges, mixes, stage size.
I’ve seen it, OK: they see that you agreed.
4.5 Open an older version
Every saved version is kept. In Projects, press Versions next to the rider.
Versions shows or hides the list.
Each version with the date it was saved.
Open as copy: a separate rider on this device, marked “(v1)”. Nothing changes online.
Restore: saves that version again as the newest one; nothing is lost. For a frozen event it’s an update like any other.
For the AV company · Chapter 5 of 8
Set up your stage
Sign in, create your company, and describe the stage once: house patch, inventory and desk patch.
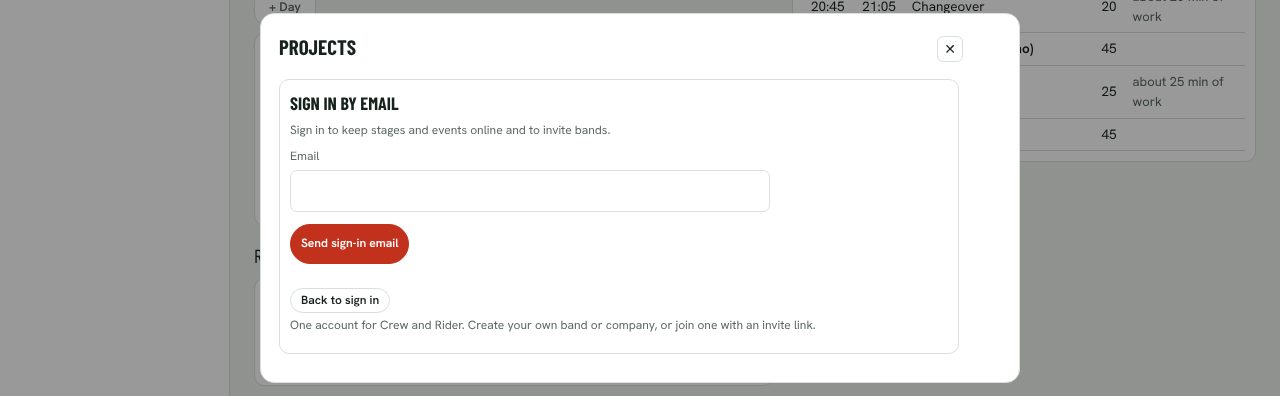
Press Projects, type your email and press Send sign-in email; then click the link in the email or type its code.
Your email address. Invitation only: use the address you were invited with, or open the link from your colleague first.
Send the sign-in email.
5.2 Create your company platform admins
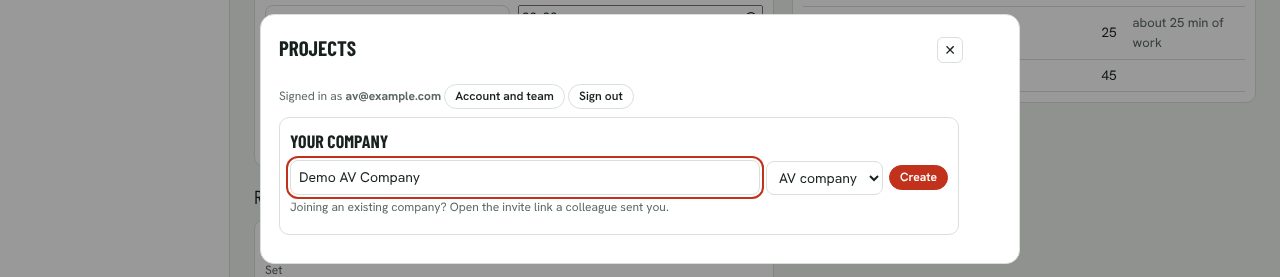
A platform admin creates the AV company (or venue) once and becomes its owner. Everyone else joins it through an invite link: Projects → Invite a colleague.
Signed in.
The company name.
AV company or venue.
Create.
Not a platform admin? You see “Ask for an invite link” instead: ask the owner of your company.
5.3 Set up the house patch
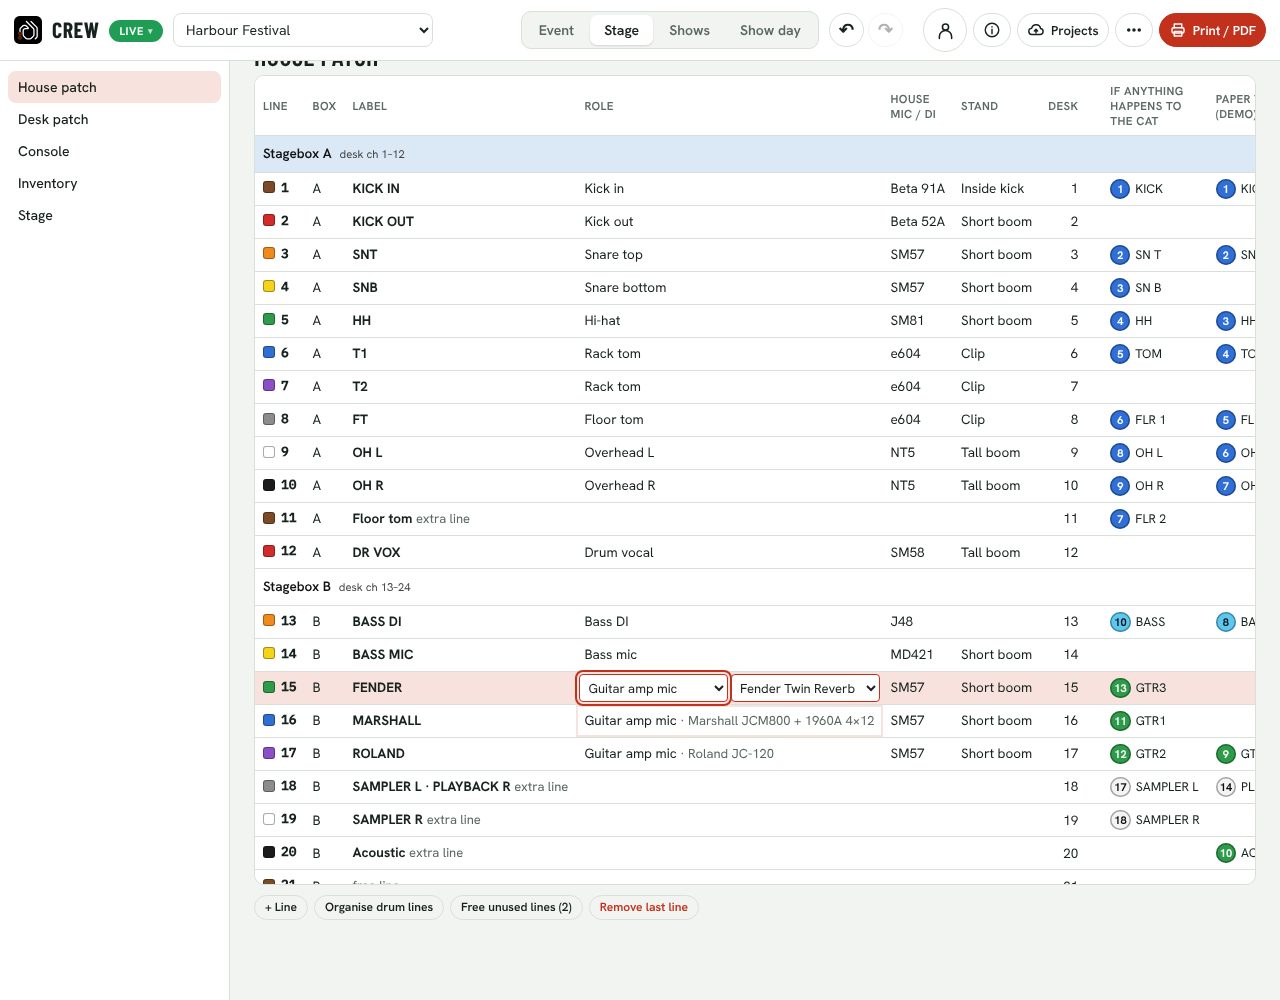
Press Stage in the top bar, then House patch on the left: your fixed lines, per stagebox. Click a cell to edit it in the table: box and label are text fields; role, house mic or DI and stand are dropdowns. Enter or a click somewhere else keeps the change; Escape undoes it. The band columns fill in as soon as there are bands in the running order. The stage’s name, console, mains and size are under Stage → Stage.
The line you’re editing; the role decides which band input lands on it.
A guitar-amp line belongs to one of your house amps.
Which band input uses the line, one column per band. The number in the dot is the band’s own channel number. Click a cell to choose another input, keep the line empty, or go back to automatic.
The desk channel the line arrives on.
Next: the inventory.
Lines without a role are free and take whatever is left over. Giving a line a role that another line has (snare top, Keys L …) swaps the two lines. Under the table: + Line; Organise drum lines (only when the drum lines are out of order) puts them in the usual order at the top of the drum stagebox; Free unused lines (n) clears the dimmed lines that no band uses. Under Stage → Stage, Export stage file keeps a copy and Import brings it to another device.
5.4 …and the inventory
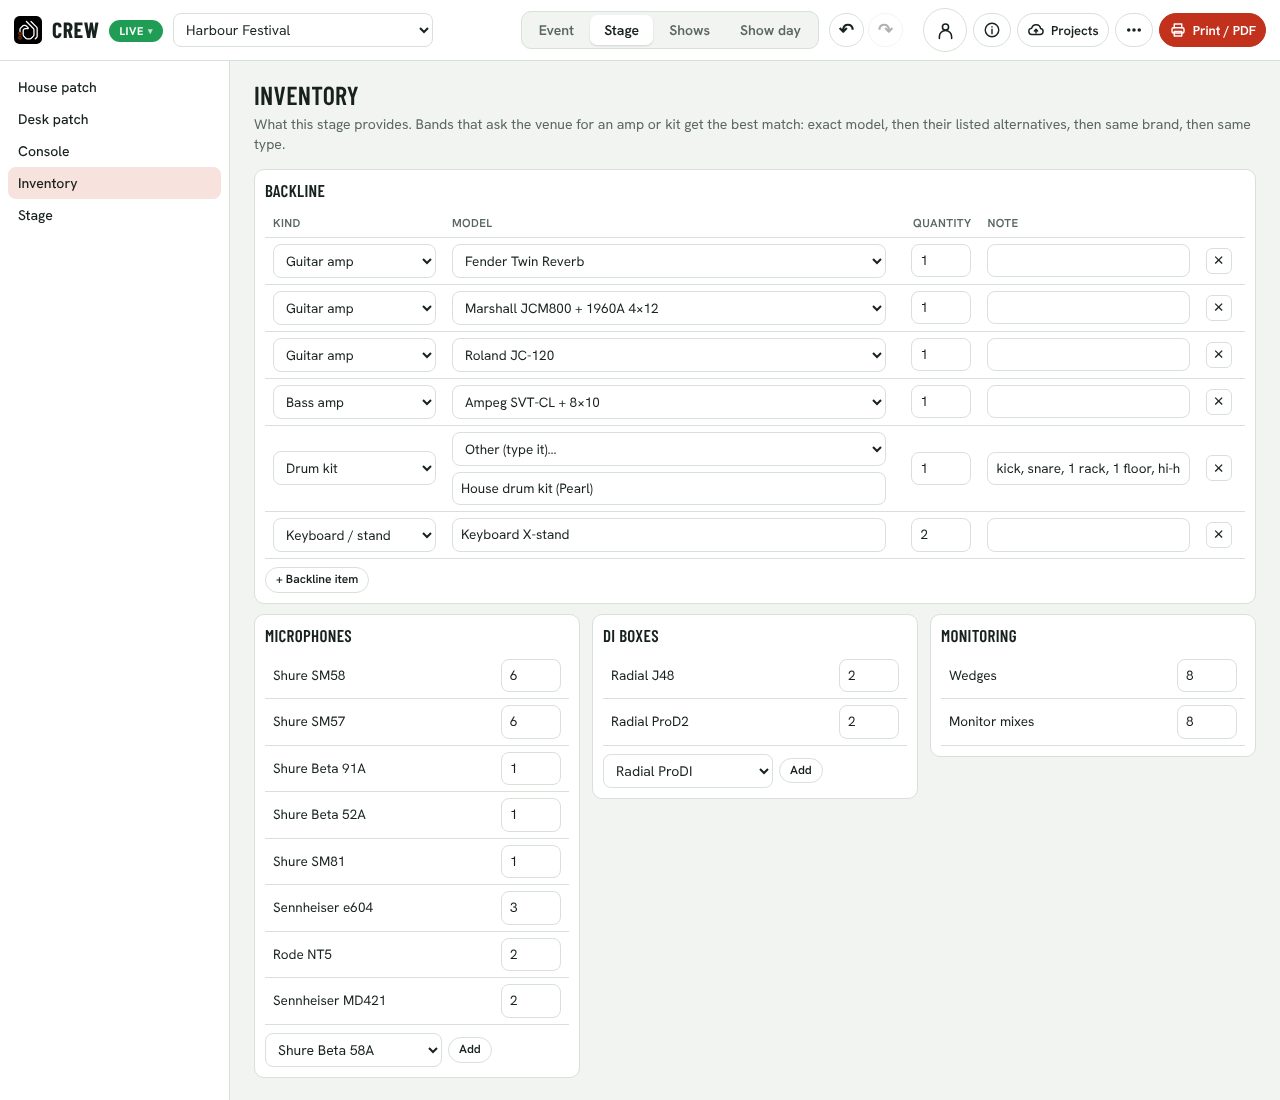
In Stage → Inventory: your backline, mics, DIs, wedges and monitor mixes. Bands asking for an amp or kit get the best match from this list; whatever runs short shows up as a warning at the top.
The model, from the list or typed (“Other”); it sets the drawing on the stage plans.
A note for the bands (what’s included).
Add a backline item.
Microphones by model; next to them DI boxes, wedges and monitor mixes.
5.5 Connect the stageboxes to the desk
In Stage → Desk patch, say where each stagebox arrives on the console. Per box, choose from the dropdowns:
On the desk: the port (local inputs, a network port such as AES50 or Dante, or not on the desk).
First input: the first input of that port.
Channels: how many of the box’s lines go to the desk.
First desk ch: the desk channel of the box’s first line.
The dropdowns only give what your console can do. On an X32 / M32 the inputs go in blocks of eight, so the starts are 1, 9, 17 … Set it on the desk then says what to set on the console (on an X32 / M32: Setup → Routing → Home, per block of eight). Desk channels lists every desk channel with its input and line. The house patch, the band pages and the X32 scene use these channel numbers.
For the AV company · Chapter 6 of 8
Plan the event
The running order, saved online, with an invite link for every band.
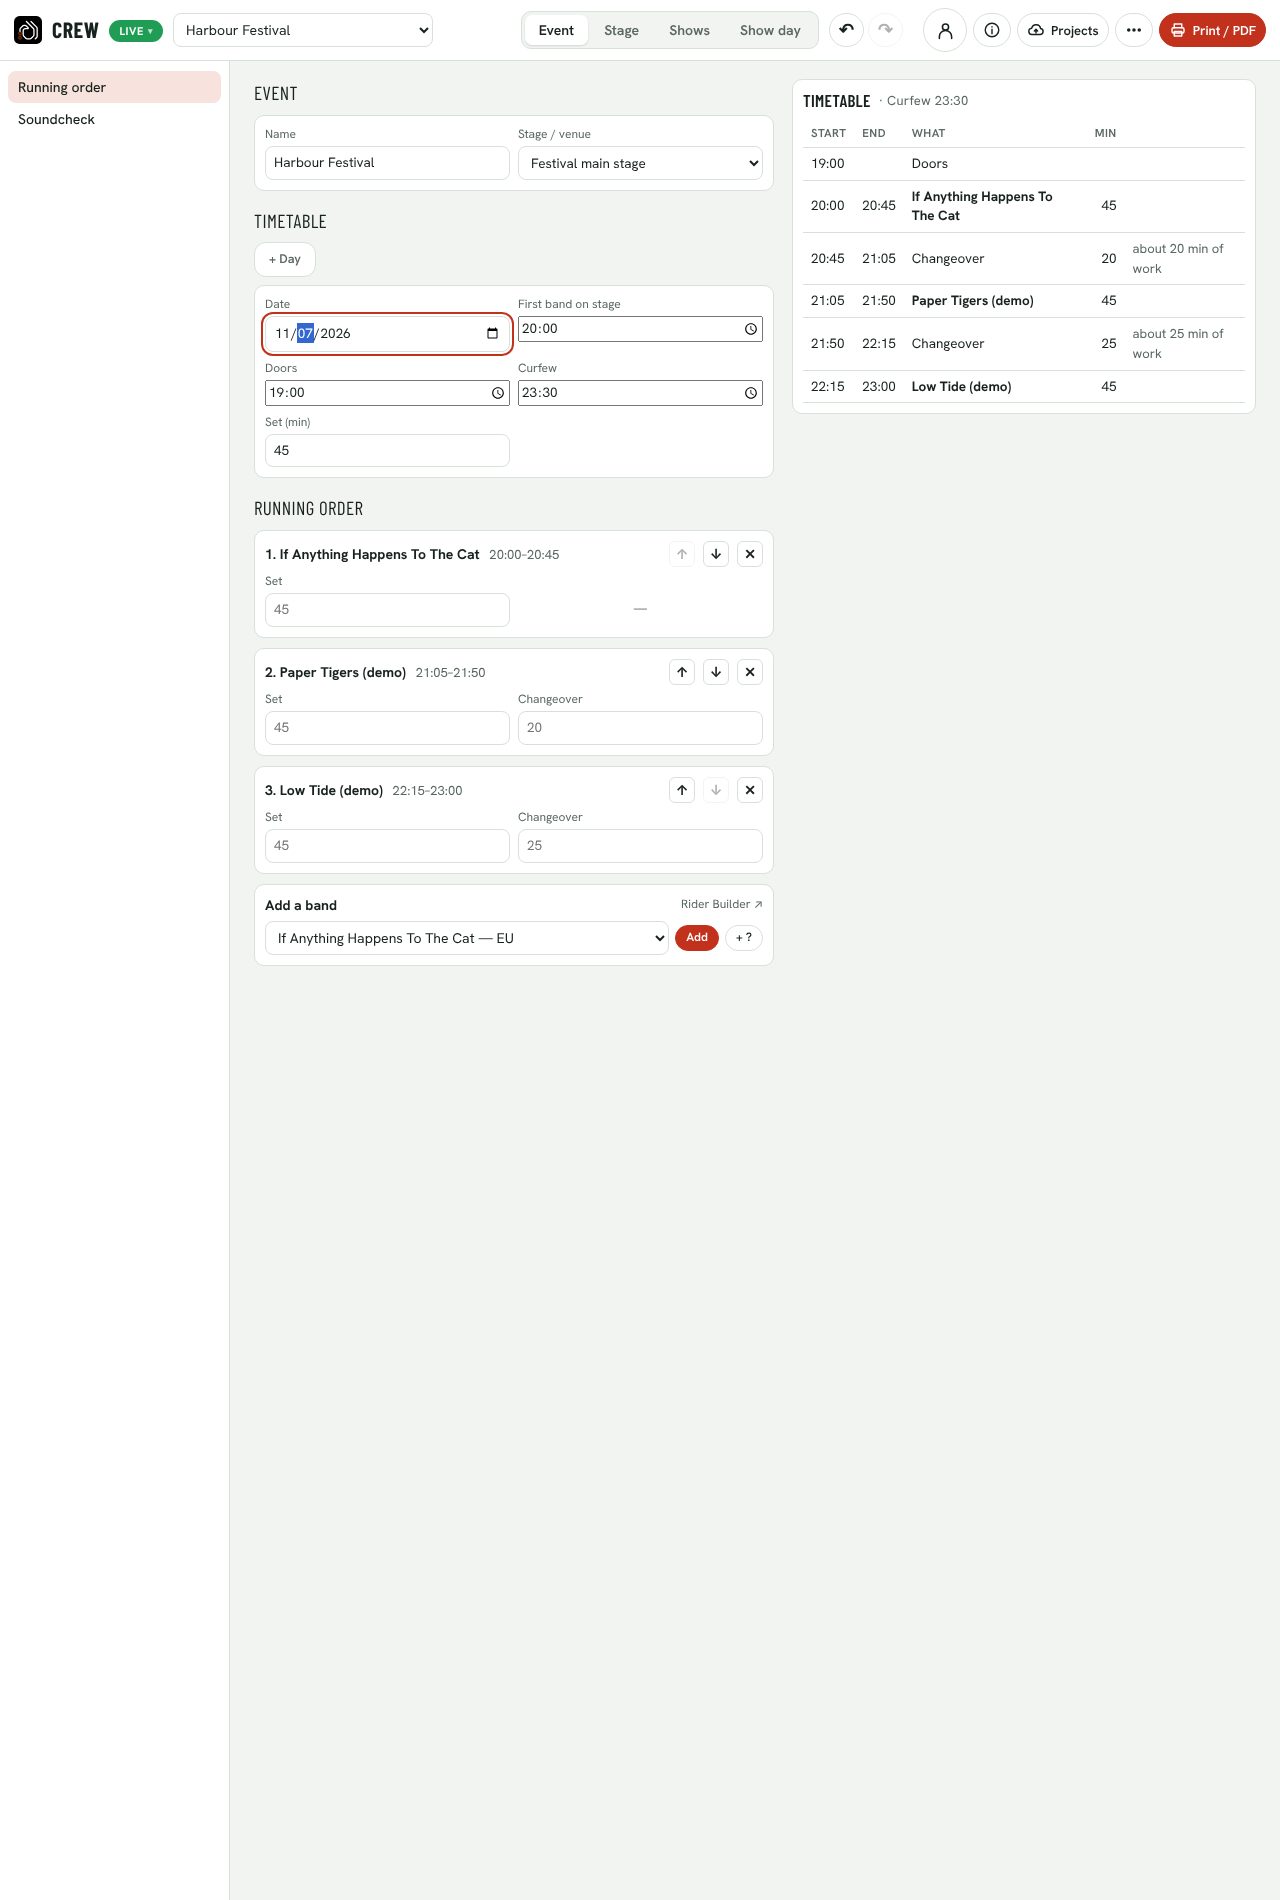
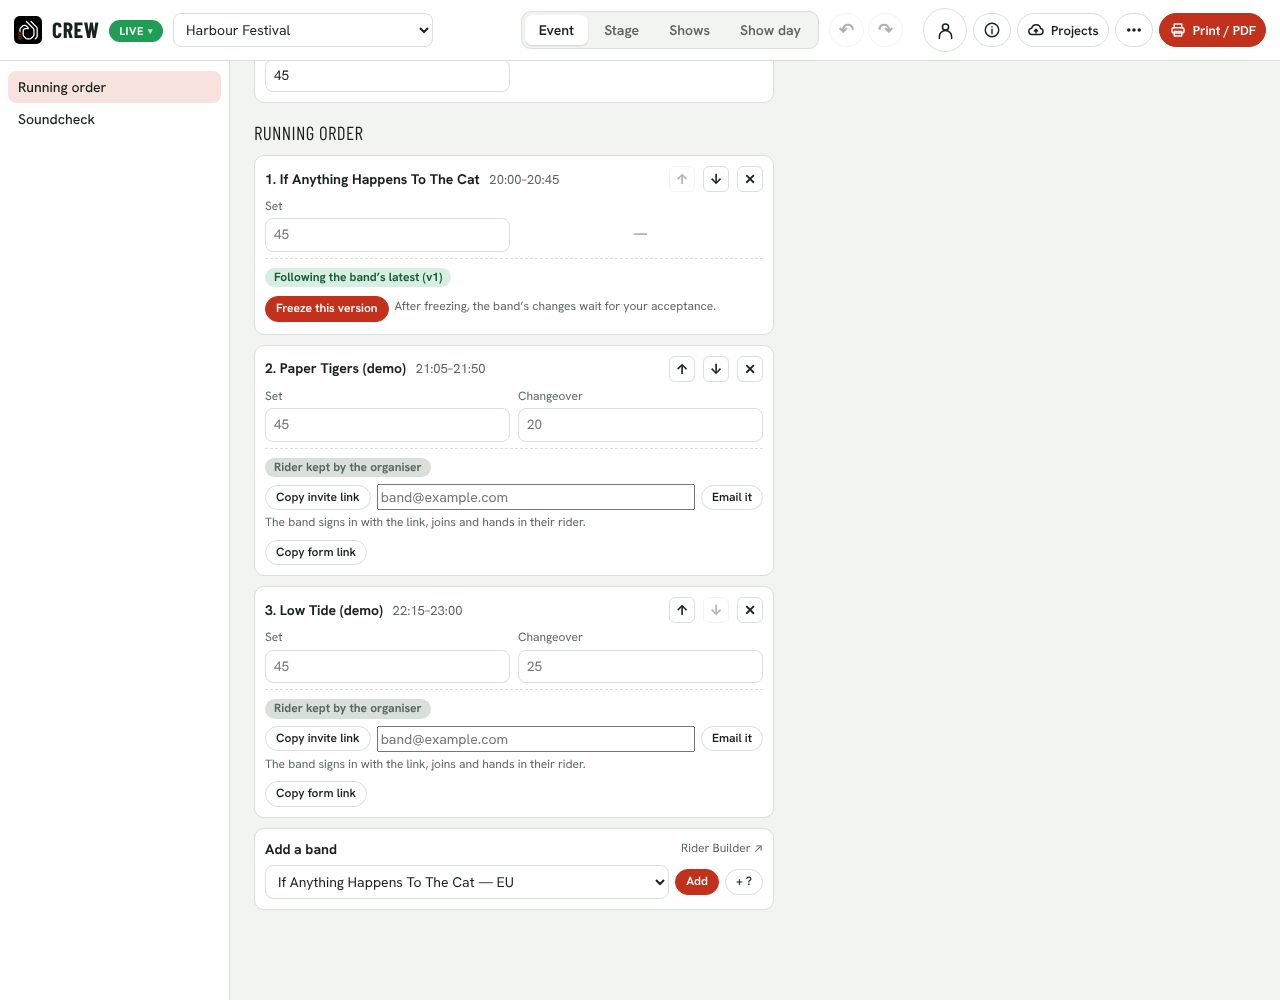
Press ⋯ More → New event (or rename the demo). In Event → Running order, set the stage and add the bands. Under Timetable, set the date, when the first band goes on, doors, curfew and the usual set length; change the set length per band where the bill needs it. A changeover gets the time its list needs. More days? + Day adds one, with its own timetable and running order. All times follow by themselves: the day’s timetable is shown beside the running order, and Print / PDF → Timetable prints it.
Event → Soundcheck has its own order per day: the running order to start with. Move bands, leave bands out, and type the start and end times.
⋯ More → New event.
The event’s name.
The stage (house patch and inventory) it runs on.
The timetable of the day: date, first band on stage, doors, curfew and the usual set length. A warning shows when the last band ends after the curfew.
The band’s set length and changeover; times follow from the timetable.
+ Day for an event of several days.
Change the order, or remove a band.
Add a band.
Add a band takes a rider from the Rider Builder on this device, a band you removed earlier, or a band from another event. Such a band stays in step with the Rider Builder: change the rider there and Crew shows the change straight away. For a band you don’t know yet, press + ?: the open slot counts in the timetable. Later, pick the band in it and press Fill, or send its invite link (6.3). Once the band hands in its own rider, the slot follows theirs.
6.2 Save the stage and the event online
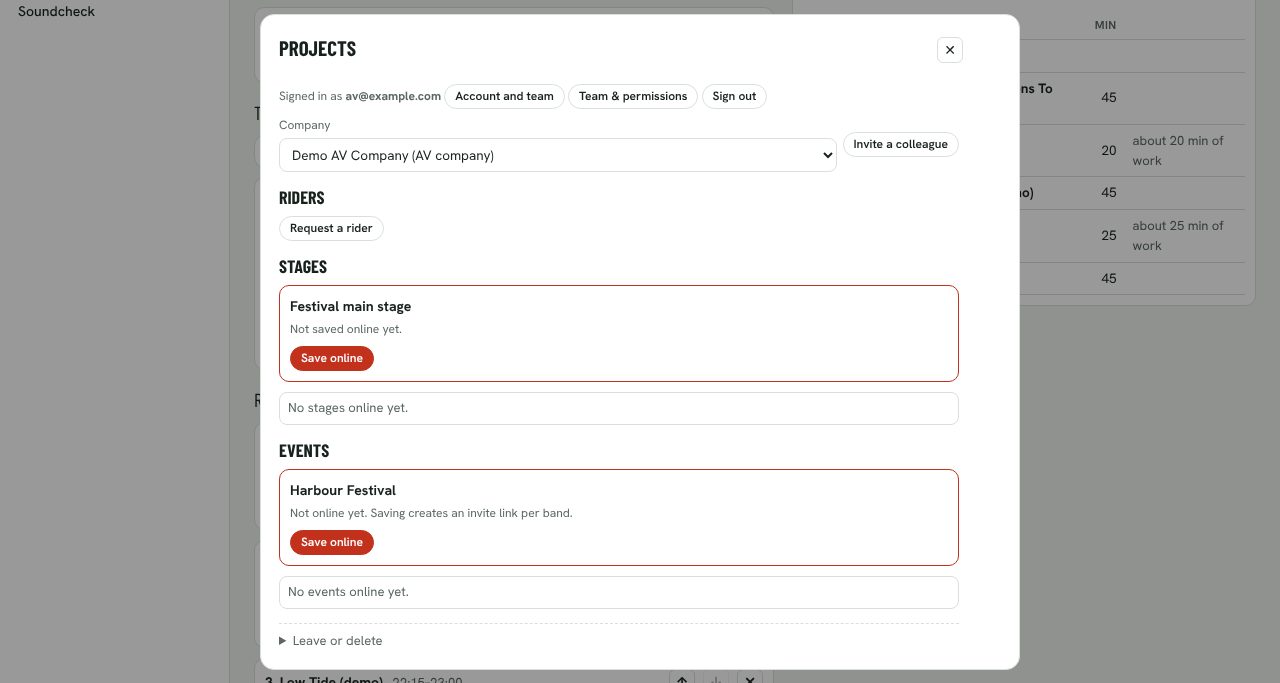
Open Projects. Saving the event online also saves the stage, and gives every band in the running order its own invite link.
Your company.
Owners: copy an invite link for a colleague.
The stage open now: save it online.
The event: Save online.
6.3 Invite the bands
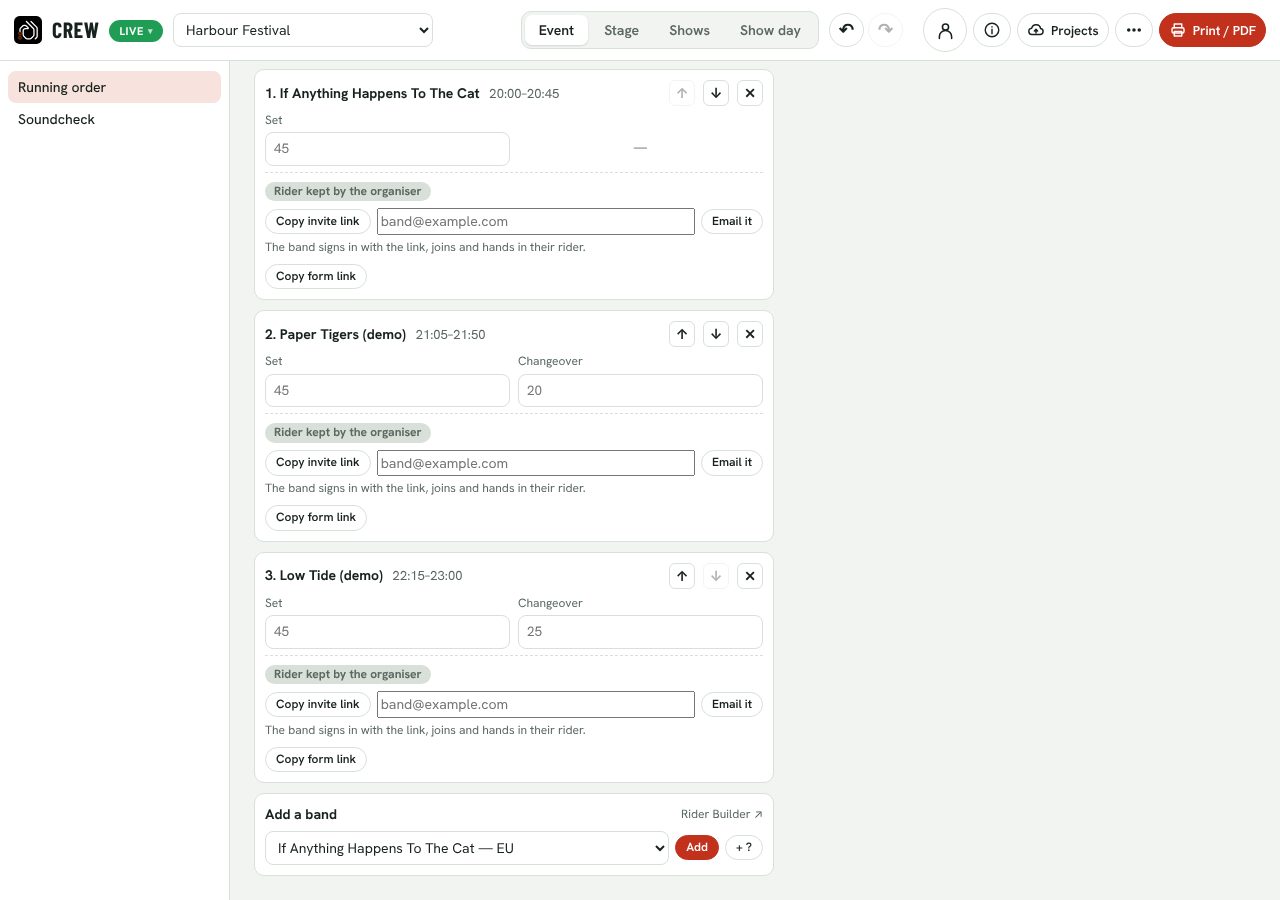
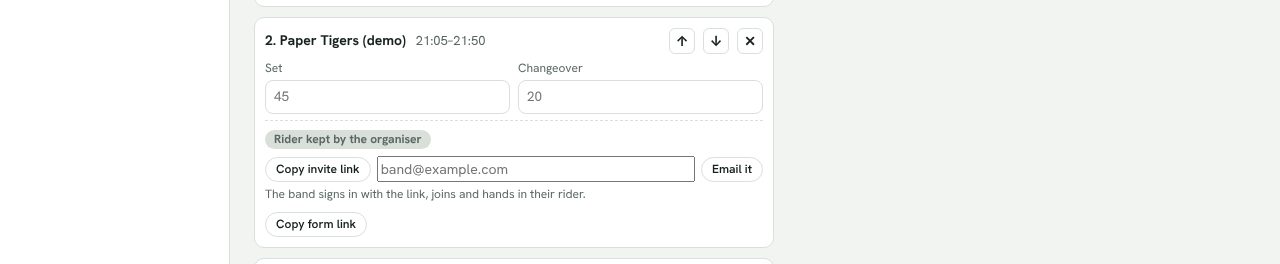
Close Projects. In the running order, every band now has its invite link: copy it and send it, or type the band’s email and press Email it.
The band hasn’t joined yet; you work with your copy.
Copy invite link.
Or the band’s email address…
…and Email it.
6.4 Riders without an invite
Three more ways to get a band’s rider:
Request a rider (Projects → Riders) copies a link for any band, no event needed. The band answers from the Rider Builder; the rider appears under Riders, where Add puts it into the event you choose. ★ marks a band that signed up through your request.
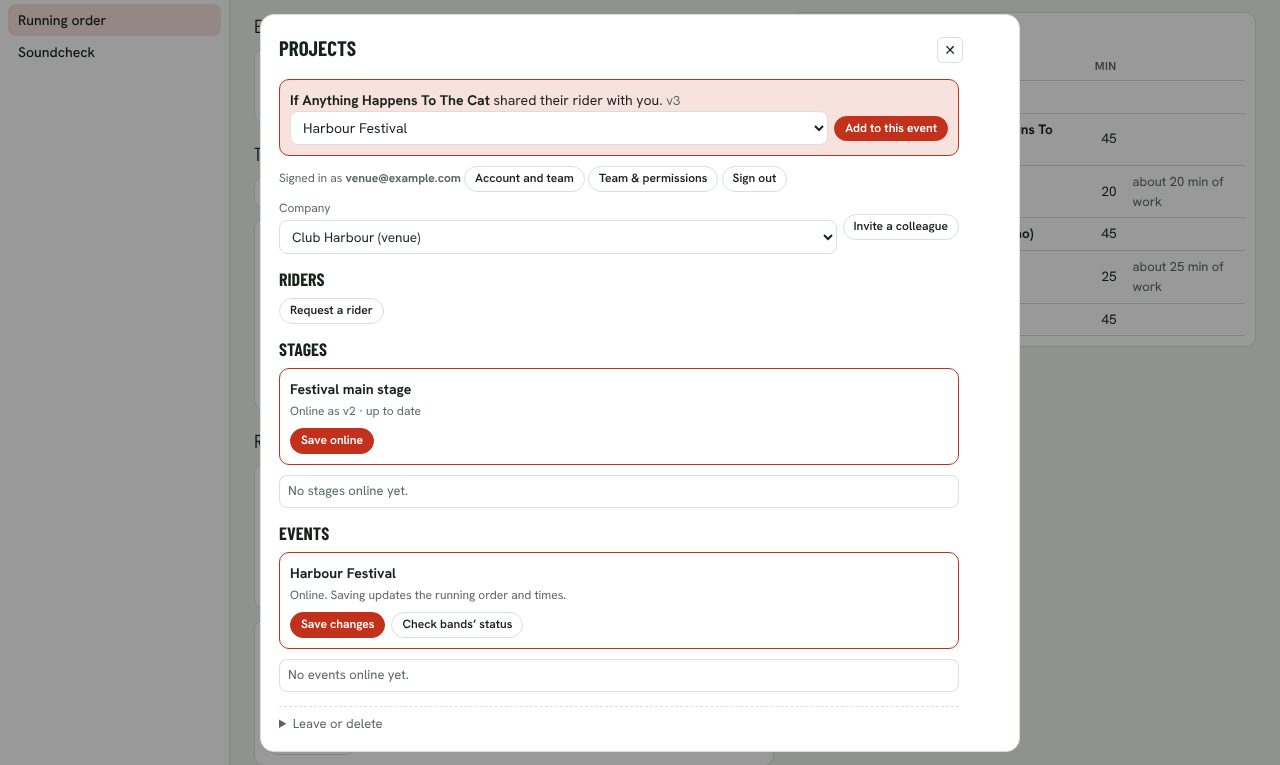
A band’s share link: press Use it on your stage, sign in (and set up your company if needed), then Add to this event. Newer versions the band saves come in by themselves.
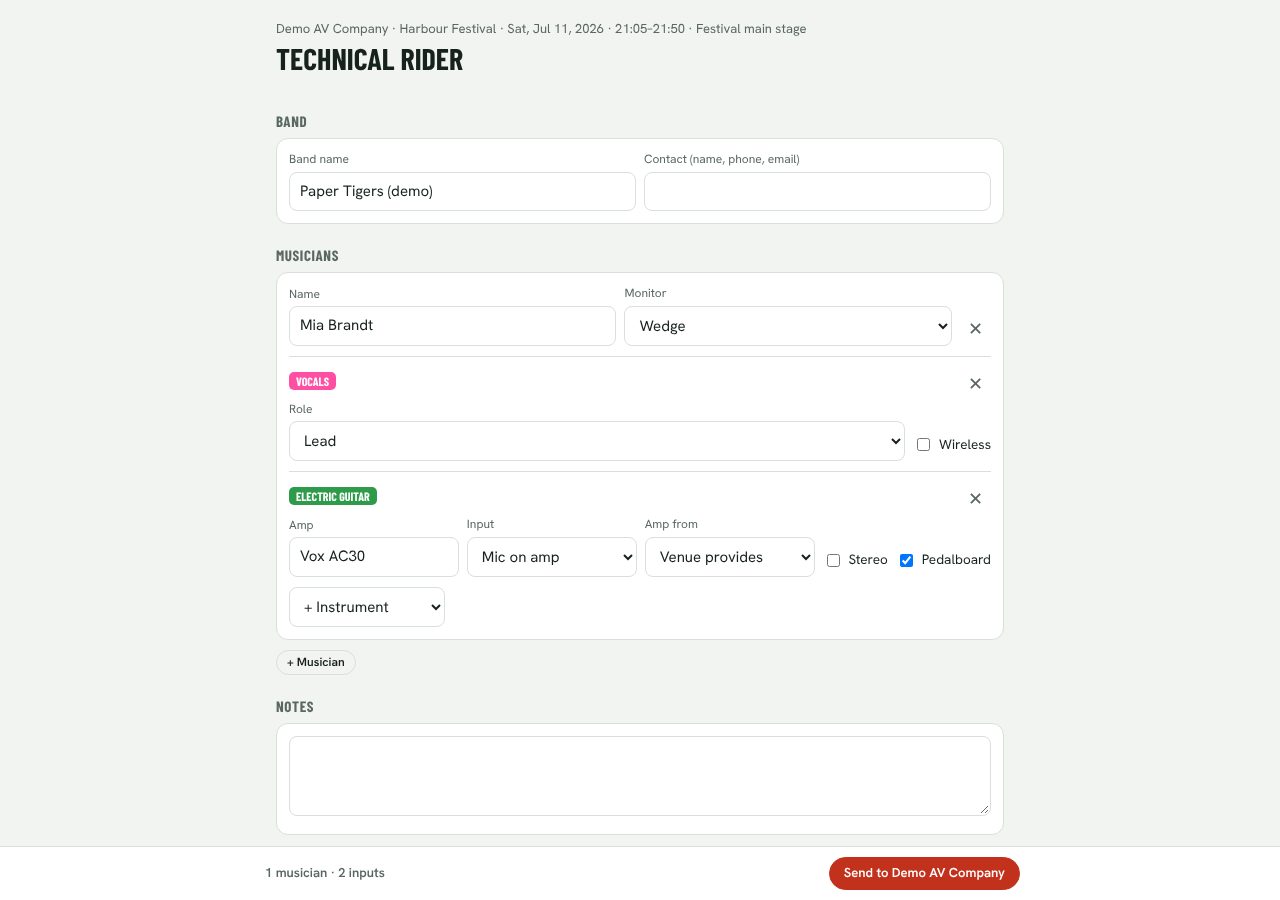
The band form for a band that won’t use the app: Copy form link on an open slot. They fill in musicians, instruments, amps, drum kit and monitors without an account; the answer becomes the slot’s rider. Lock it when you start building the stage.
Request a rider: copies a link for any band.
A rider a band sent you, with its version and date.
The event…
…and Add.
The shared rider and its version.
The event to add it to.
Add to this event.
Copy form link: the band fills in the form without an account.
The invite link, for a band that uses the app.
The event and slot the form is for.
Each musician, with wedge or in-ears.
Per instrument, only what matters on stage.
+ Instrument.
Send it to the organiser; the same link sends changes later.
For the AV company · Chapter 7 of 8
Follow the bands
See where each band stands, freeze riders, and review, accept or decline their updates.
Press Check bands’ status in Projects to fetch the latest. When a band has handed in and you’re ready to plan with their rider, press Freeze this version.
This band handed in: you follow their latest version (v1).
Freeze this version: from now on their changes wait for you.
This band hasn’t joined yet…
…so its invite link is still here.
7.2 Review an update as changeover steps
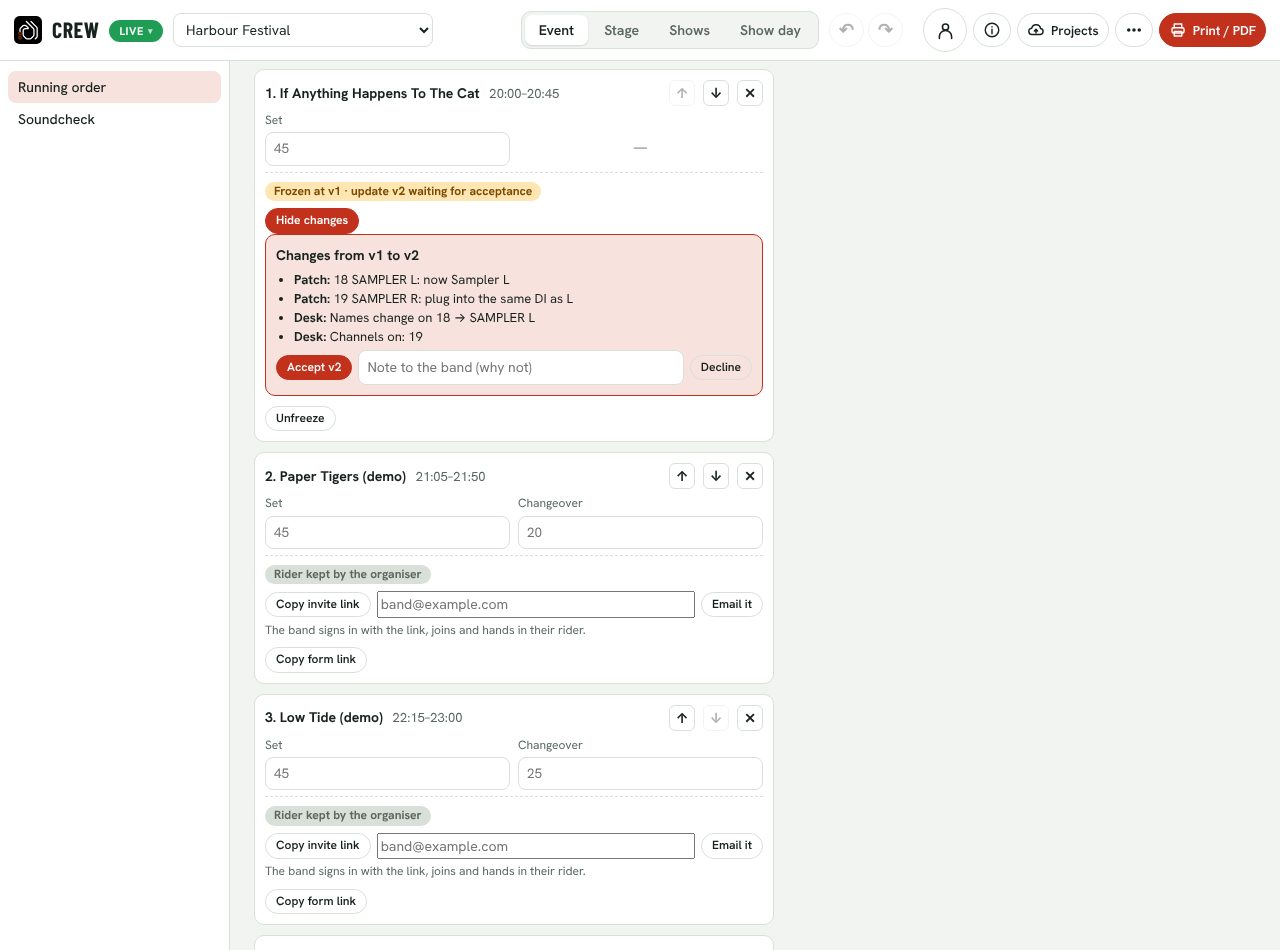
When a frozen band saves a new version, their slot says update waiting for acceptance. Press See what changed: the update is shown as the steps your crew would have to take on your stage.
The event.
The band.
Their update as steps: patch, monitors, desk, backline, lighting.
The workspaces (Stage, Shows, Show day) work on your current, frozen version.
Projects: check the bands’ status again later.
7.3 Accept or decline
Accept the update, or decline it with a note the band will see. Declining keeps the frozen version.
Frozen at v1, update v2 waiting.
What v2 changes on your stage. Texts and notes alone show as “no changes that affect the stage”.
Accept v2: it becomes the version you work with.
A note for the band…
…and Decline.
7.4 Change the stage, and see who still has to acknowledge
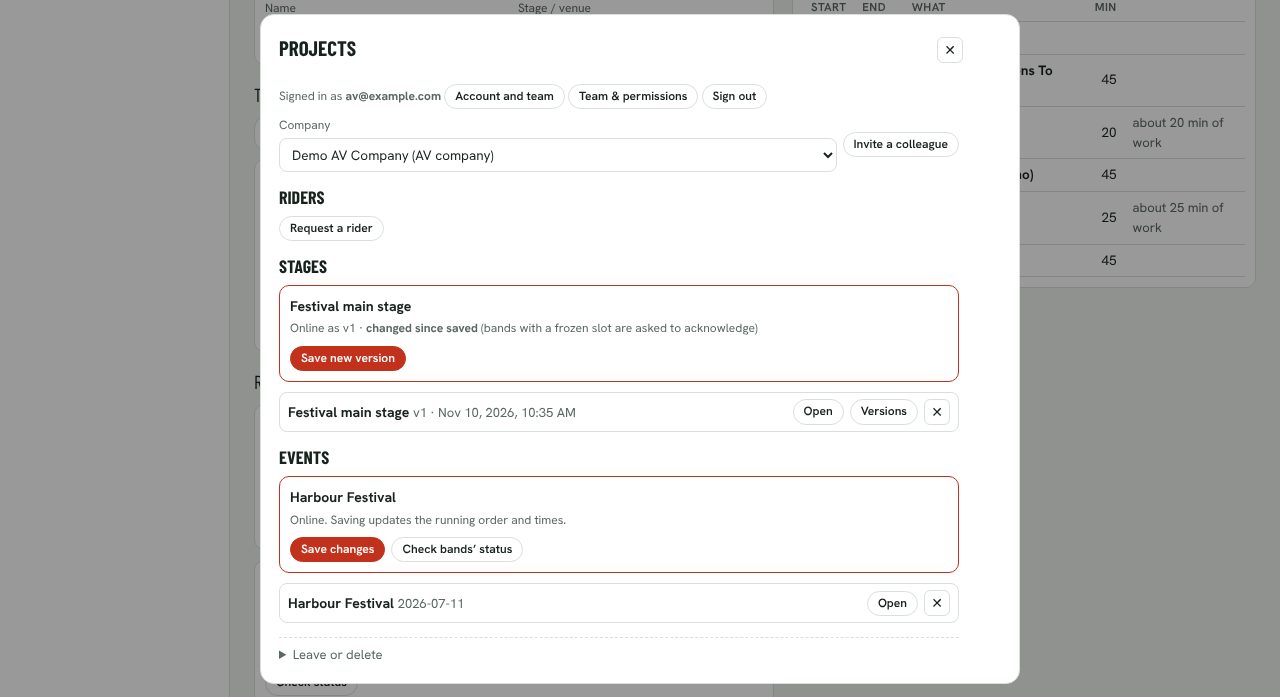
Edit the house patch or inventory as usual; Projects shows the stage has changed since it was saved. Save new version asks every band with a frozen rider to acknowledge the change.
Changed since saved: bands with a frozen slot will be asked to acknowledge.
Save new version.
Versions: every saved version of the stage, to open as a copy.
Each frozen band’s slot then says it’s waiting for the band, until they acknowledge.
Frozen at v3 (the update the band saved after your note).
You changed the stage after freezing: waiting for the band to acknowledge. Afterwards it says when they did.
Unfreeze: follow the band’s latest version again.
For the AV company · Chapter 8 of 8
Show day
Print the paperwork, check each band on the console, tick off the changeover checklists, and load an X32 scene per band.
8.1 Print the house patch, backline check and band pages
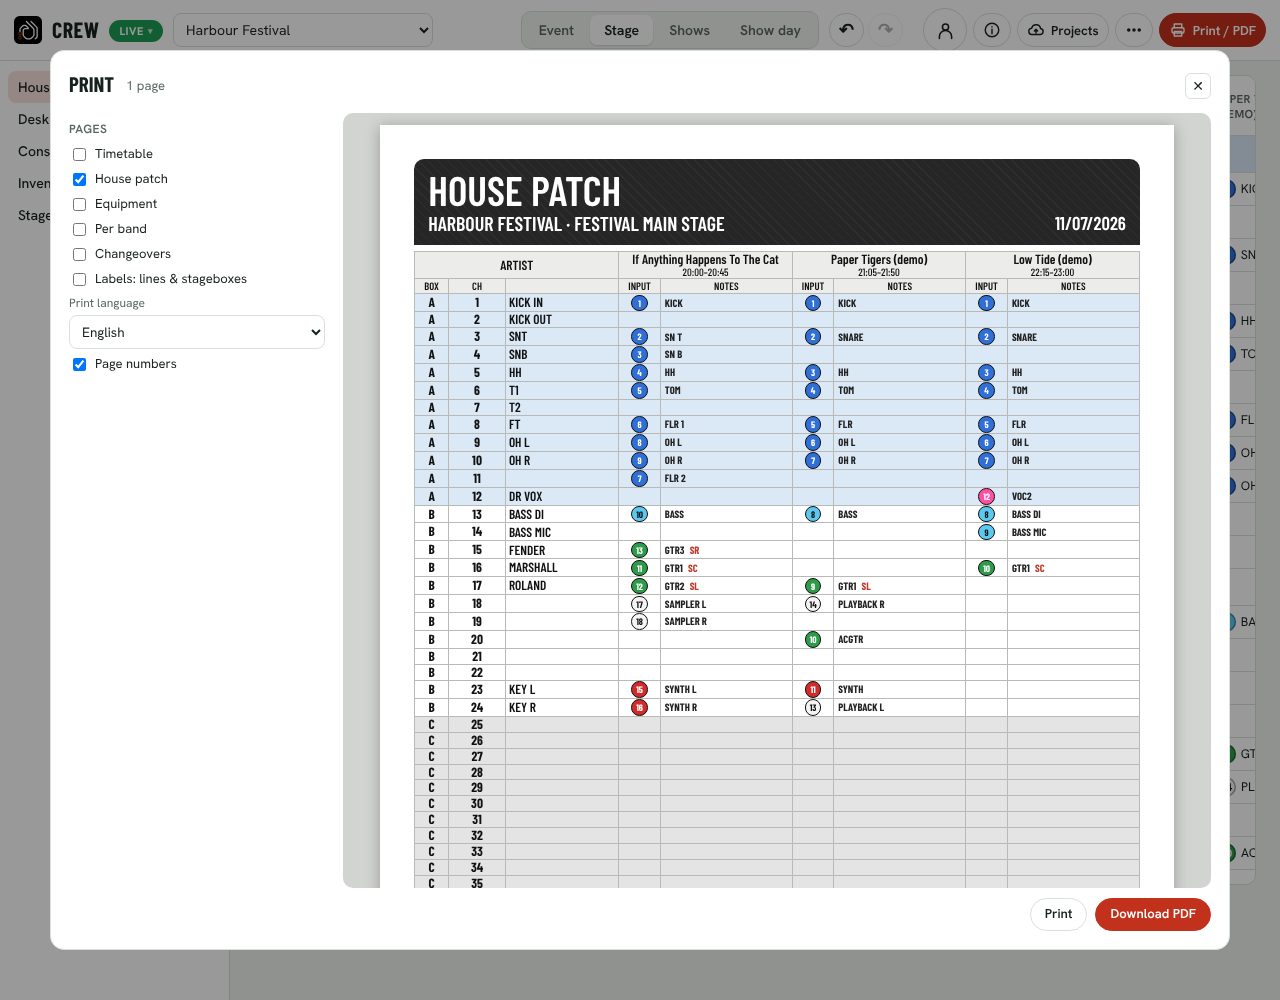
Print / PDF makes the paperwork: tick the pages you need (timetable, house patch, equipment, per band, changeovers, labels), the days and the print language, then print or download a PDF. The screens are for working; only the Print window shows A4 pages.
Tick the pages to print.
Download a PDF (or Print).
One column per band, with the set time.
SL / SC / SR: where the amp on that line stands.
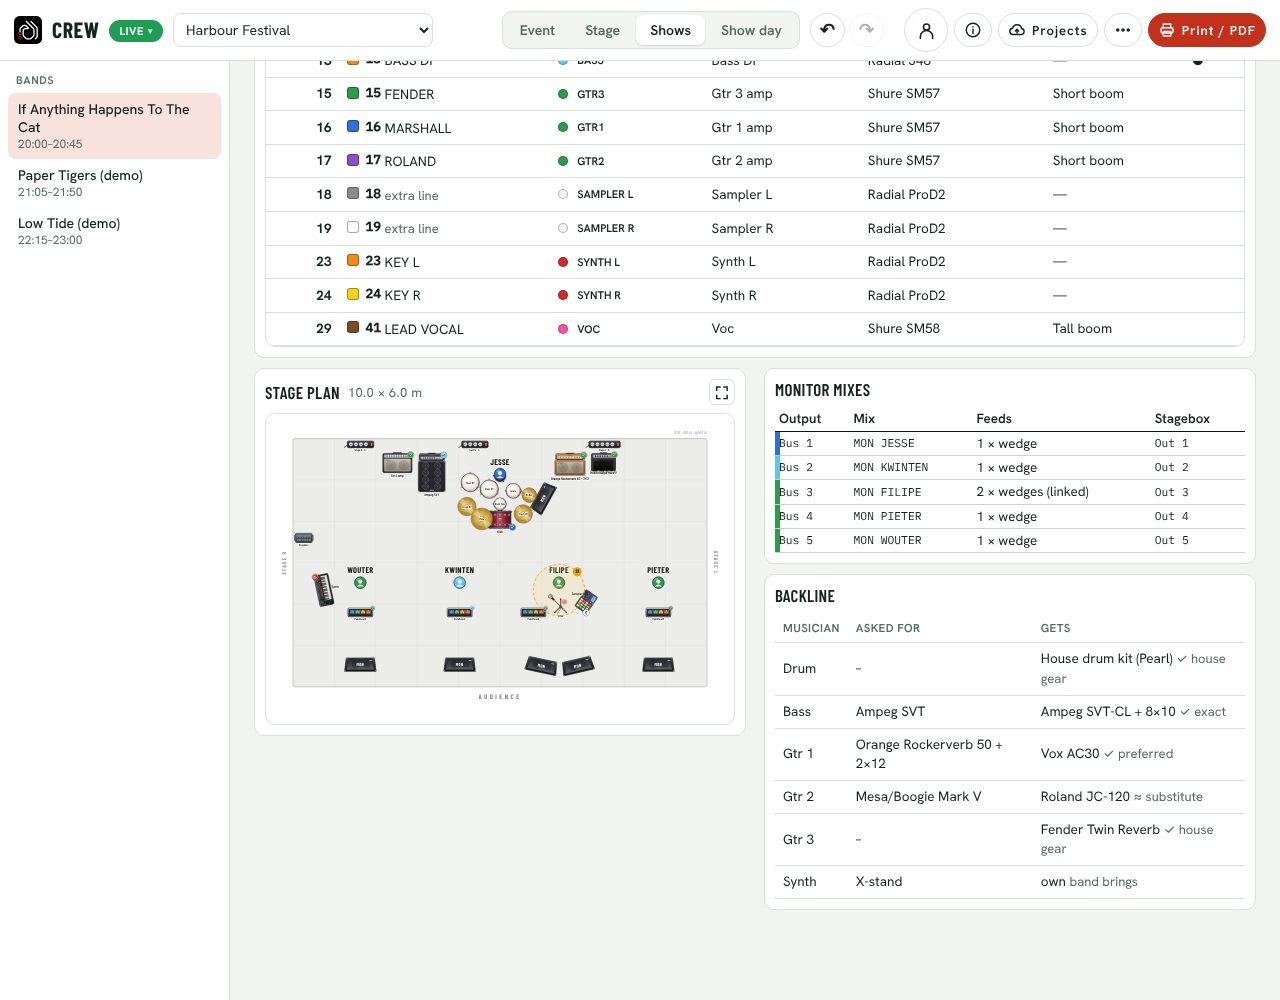
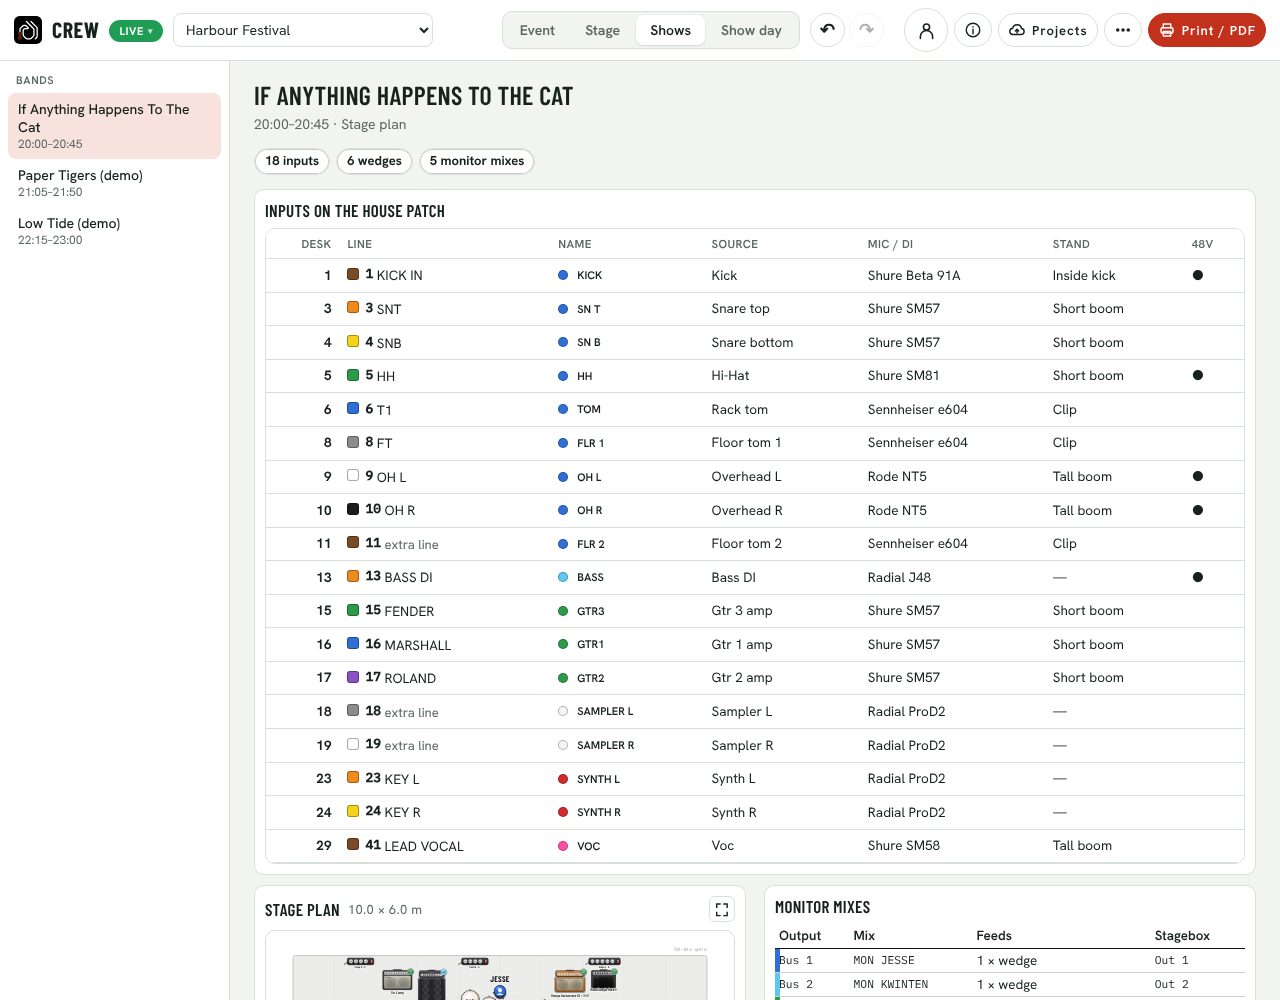
On screen, Shows has a page per band: what each musician asked for, what they get from your inventory, and what is short. For a mic or DI that is short, pick a stand-in from your spare stock per input, in the band’s input list or in the shortages pop-up (⚠ in the top bar).
Backline: asked for, and what they get.
A substitute.
The band brings it.
What is short today: click for the fixes.
Each band’s screen, for the engineers and the lighting designer, on your stage (printed as Per band).
The bands of the day; the number is what is short.
Inputs, wedges, monitor mixes and shortages at a glance.
Their inputs on your house lines (Desk = mixer channel, Line = house line), with mic, stand and 48V; below them the stage plan, monitor mixes, backline and the changeover from the band before. ⛶ opens the stage plan full screen, to move gear for your stage (with its own ↶ ↷).
8.2 Check each band on the console
Stage → Console shows your desk for one band at a time, in one row as on the desk. Step through the bands with ◀ ▶. Each channel shows its source, line, role, input, mic or DI and stand; under them the channel strip (48V, select, mute or ON, fader) and the name strip with the musician’s name. Click a cell to change it. The mixes, DCAs and mains are in a row below. Only the channels in use are shown; + / − show more or fewer.
Want the band’s channels in another order on the desk? Drag a name strip between two others. The channel numbers stay and the inputs move; the X32 scene follows. ↺ Original order puts it back.
8.3 Changeover checklists and an X32 scene per band
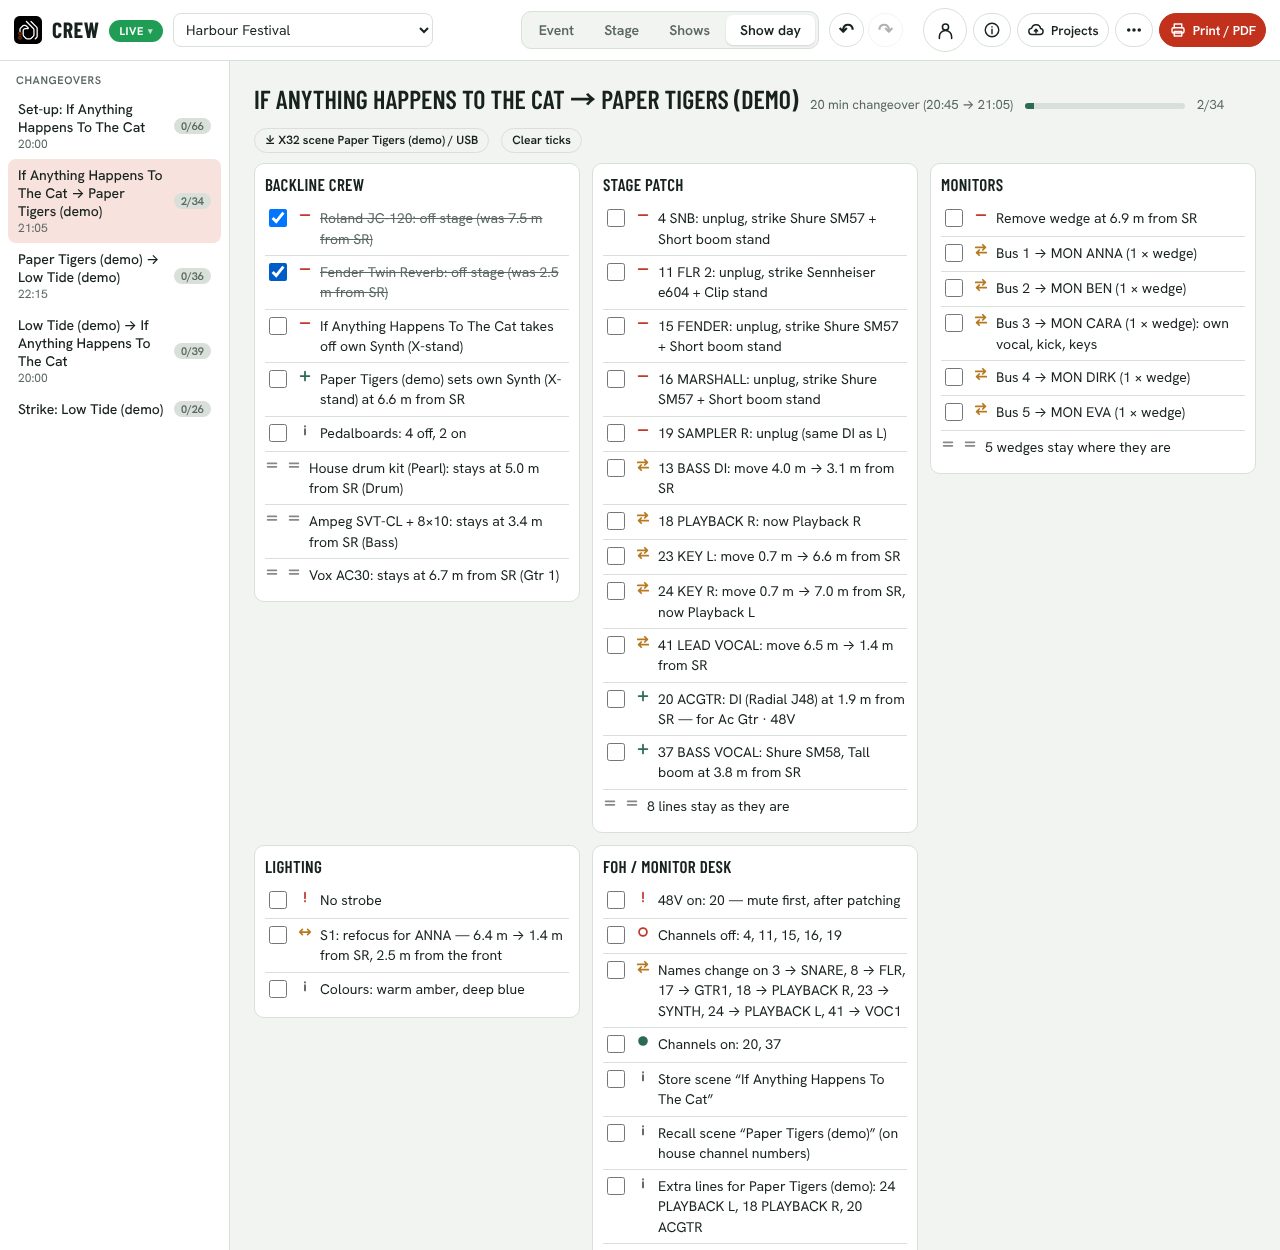
Show day has every switch (set-up, each band to the next, strike) as checklists per crew, with positions in metres from stage right. Pick a changeover on the left and tick steps off as they are done; the bar shows the progress, and Clear ticks starts again. When the stage has an X32 / M32, download the X32/M32 scene for the incoming band: channel names, colours, gain starting points, 48V and bus names on your house channel numbers. Print / PDF → Changeovers prints them. The crew app prototype at /crew/app/ shows the same changeovers and ticks on this device.
Which changeover, how many minutes, and how far the crew is.
The X32 scene for the incoming band.
Backline crew.
Stage patch.
Monitors.
A step done.
Every changeover of the day, with the steps done. Lighting and the desk follow below.
The scene follows the Desk patch of your stage (Stage → Desk patch), holds desk channels 1–32, and its gains are starting points. See what the scene contains.